
Create InfluxDB and Kapacitor connections
Connections to InfluxDB and Kapacitor can be configured through the Chronograf user interface (UI) or with JSON configuration files:
- Manage InfluxDB connections using the Chronograf UI
- Manage InfluxDB connections using .src files
- Manage Kapacitor connections using the Chronograf UI
- Manage Kapacitor connections using .kap files
Note: Connection details are stored in Chronograf’s internal database chronograf-v1.db.
You may administer the internal database when restoring a Chronograf database
or when migrating a Chronograf configuration from BoltDB to etcd.
Manage InfluxDB connections using the Chronograf UI
To create an InfluxDB connection in the Chronograf UI:
Open Chronograf and click Configuration (wrench icon) in the navigation menu.
Click Add Connection.
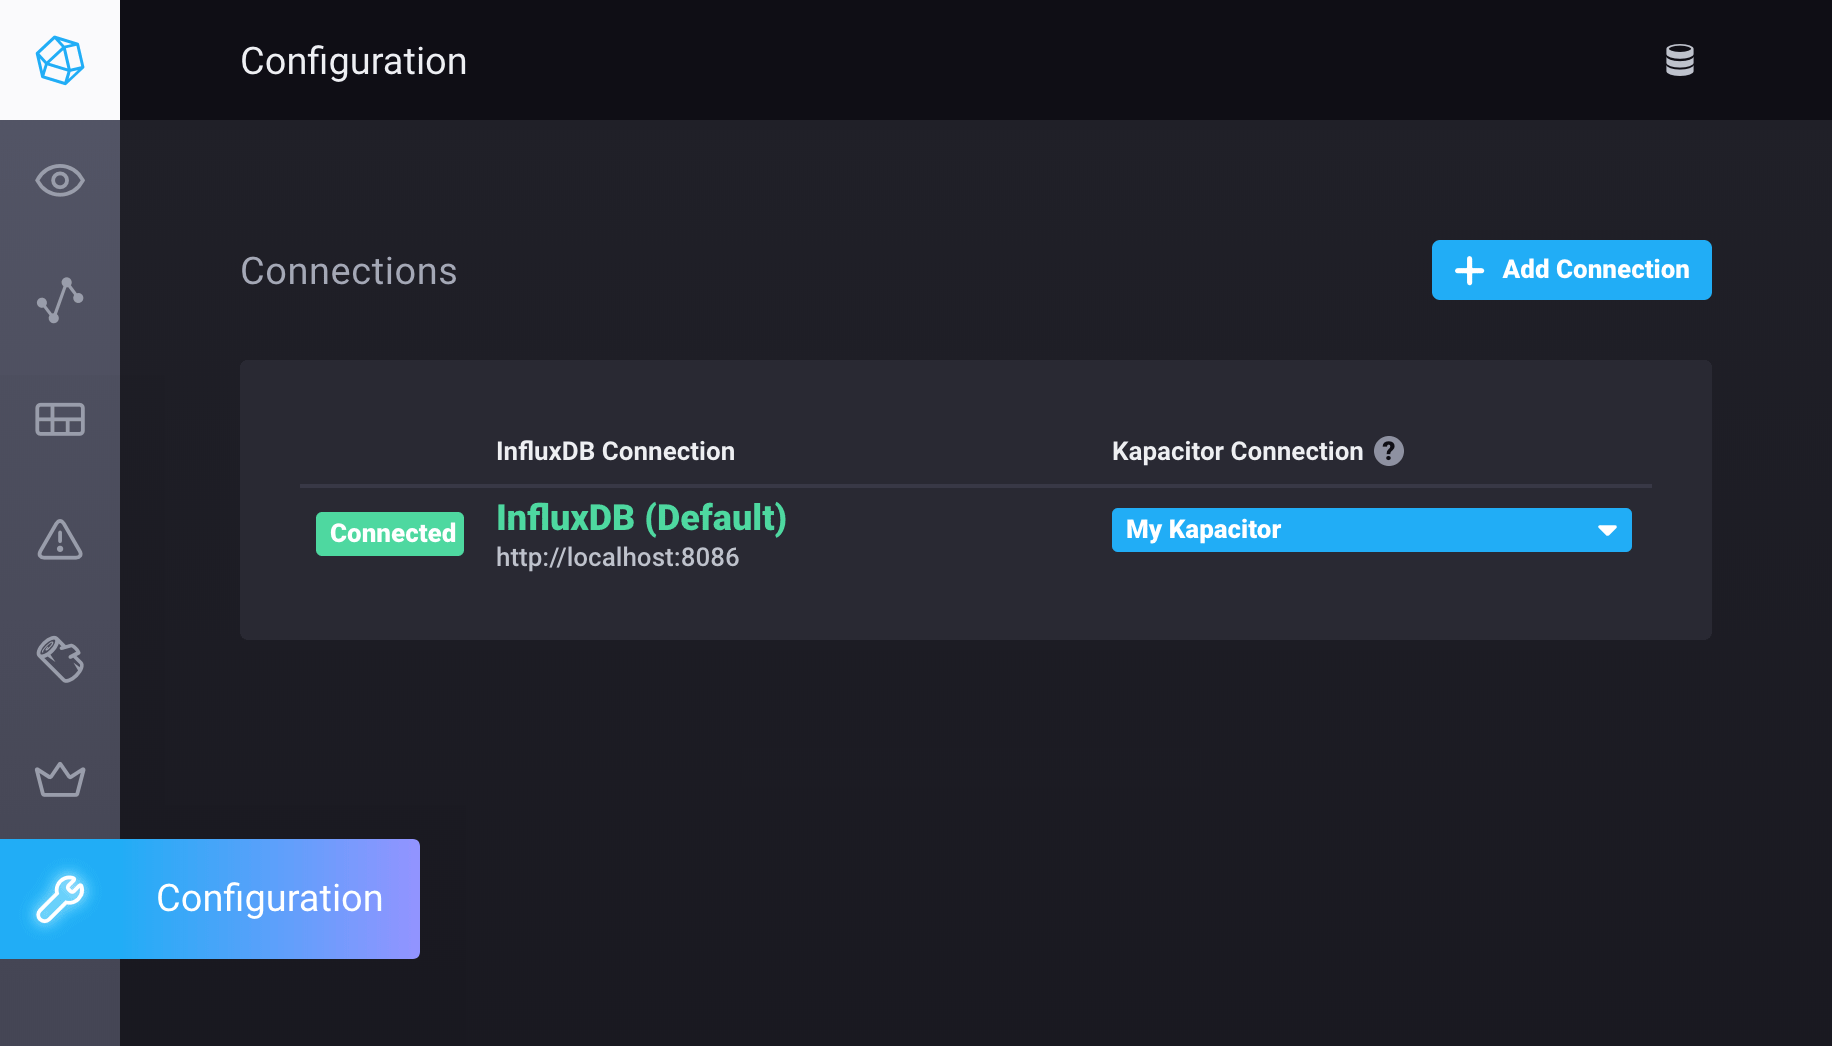
Provide the necessary connection credentials.
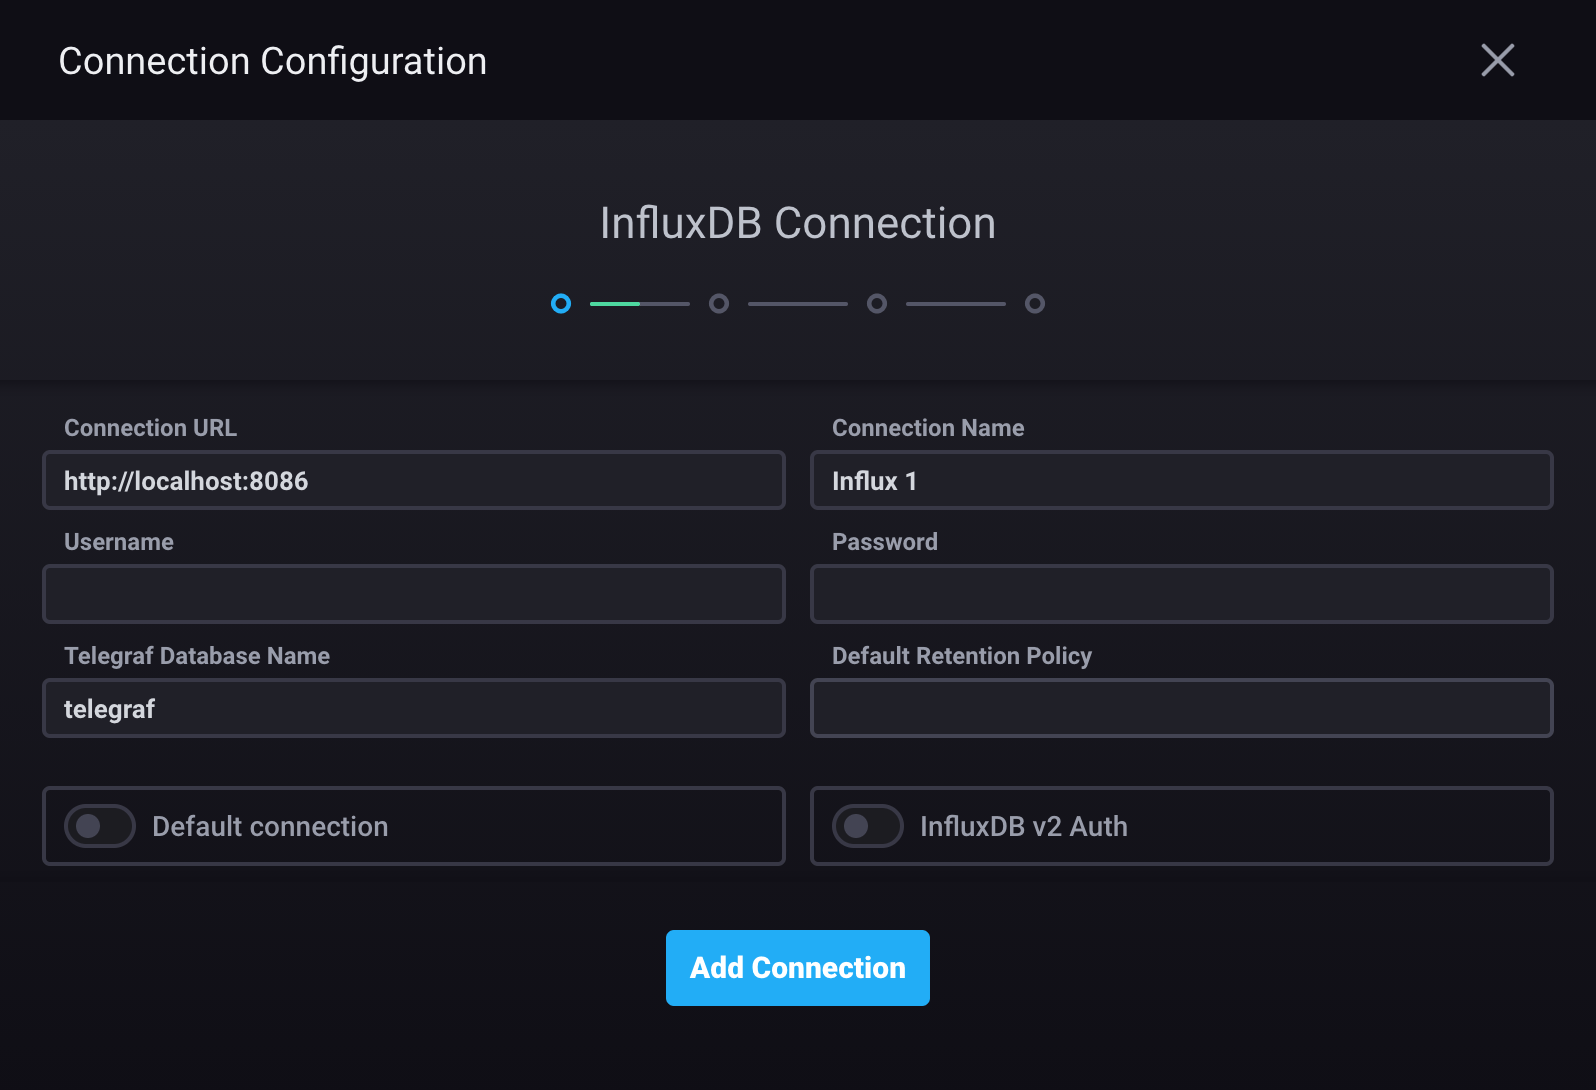
- Connection URL: hostname or IP address and port of the InfluxDB 1.x instance
- Connection Name: Unique name for this connection.
- Username: InfluxDB 1.x username (Required only if authorization is enabled in InfluxDB)
- Password: InfluxDB password (Required only if authorization is enabled in InfluxDB)
- Telegraf Database Name: the database Chronograf uses to populate parts of the application, including the Host List page (default is
telegraf) - Default Retention Policy: default retention policy
(if left blank, defaults to
autogen) - Default connection: use this connection as the default connection for data exploration, dashboards, and administrative actions
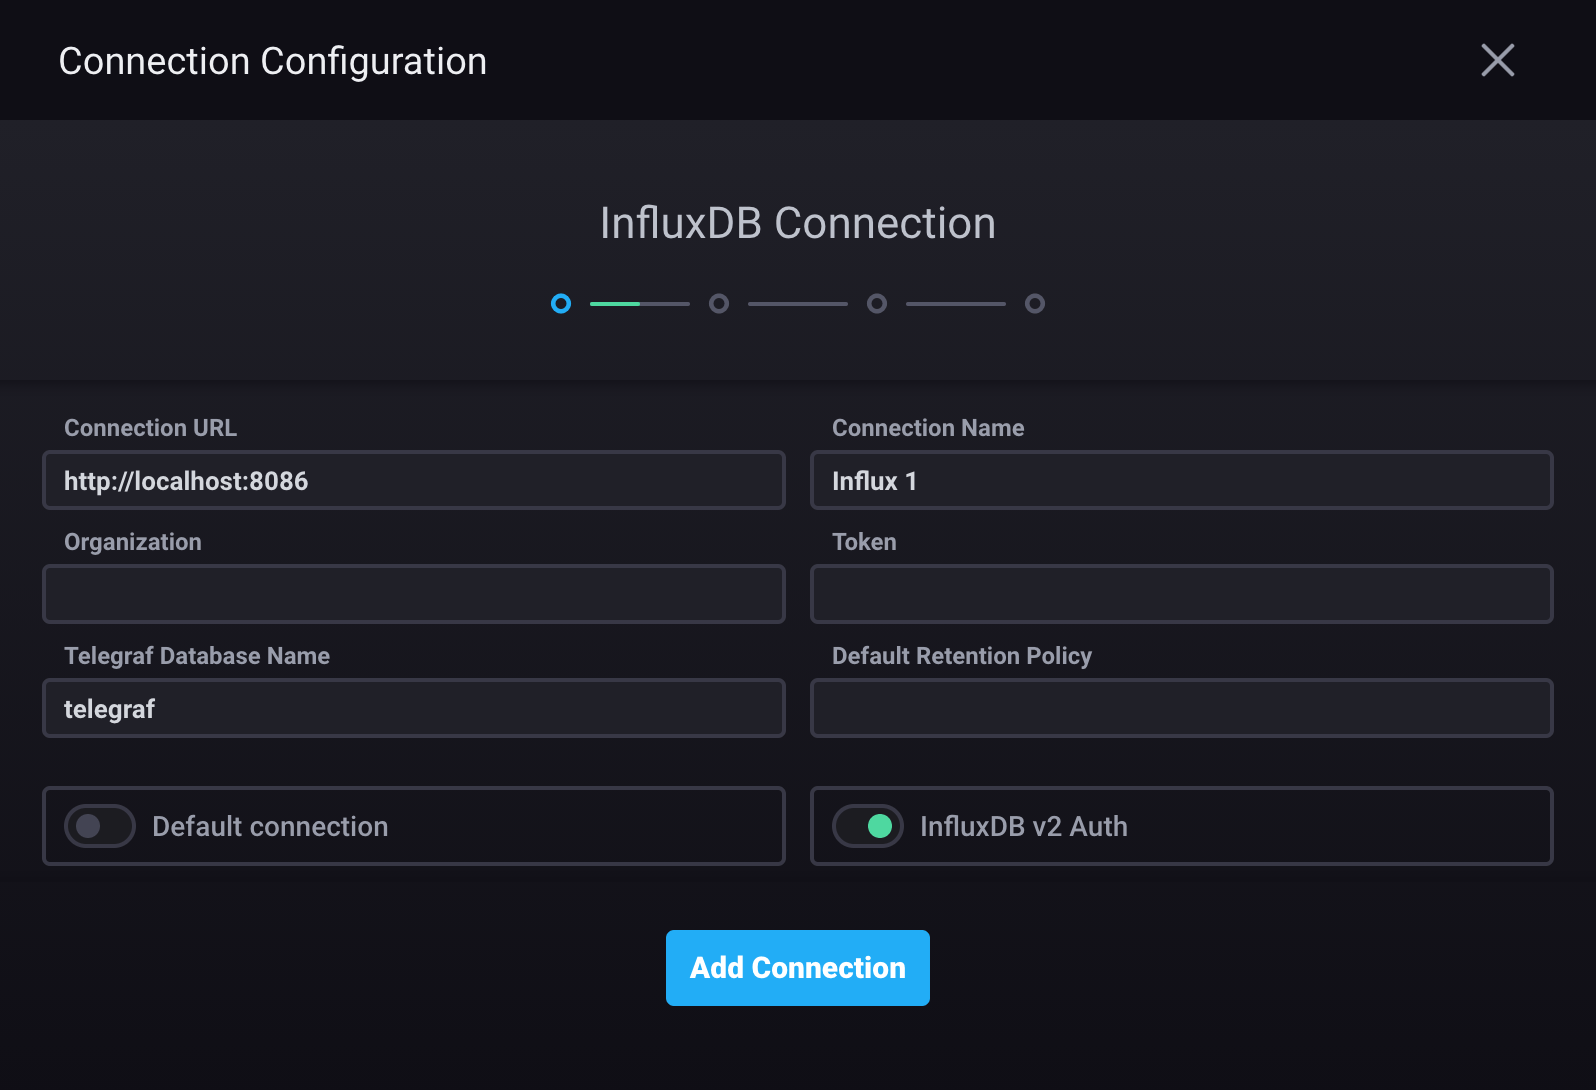
Enable the InfluxDB v2 Auth option
Connection URL: InfluxDB Cloud region URL or InfluxDB OSS 2.x URL
Connection Name: Unique name for this connection.
Organization: InfluxDB organization
Token: InfluxDB authentication token
Telegraf Database Name: InfluxDB bucket Chronograf uses to populate parts of the application, including the Host List page (default is
telegraf)Default Retention Policy: default retention policy (leave blank)
Default connection: use this connection as the default connection for data exploration and dashboards
For more information about connecting Chronograf to an InfluxDB Cloud or OSS 2.x instance, see:
Click Add Connection
- If the connection is valid, the Dashboards window appears, allowing you to import dashboard templates you can use to display and analyze your data. For details, see Creating dashboards.
- If the connection cannot be created, the following error message appears: “Unable to create source: Error contacting source.” If this occurs, ensure all connection credentials are correct and that the InfluxDB instance is running and accessible.
The following dashboards are available:
- Docker
- Kubernetes Node
- Riak
- Consul
- Kubernetes Overview
- Mesos
- IIS
- RabbitMQ
- System
- VMware vSphere Overview
- Apache
- Elastisearch
- InfluxDB
- Memcached
- NSQ
- PostgreSQL
- Consul Telemetry
- HAProxy
- Kubernetes Pod
- NGINX
- Redis
- VMware vSphere VMs
- VMware vSphere Hosts
- PHPfpm
- Win System
- MySQL
- Ping
Manage InfluxDB connections using .src files
Manually create .src files to store InfluxDB connection details.
.src files are simple JSON files that contain key-value paired connection details.
The location of .src files is defined by the --resources-path
command line option, which is, by default, the same as the --canned-path.
A .src file contains the details for a single InfluxDB connection.
Only InfluxDB 1.x connections are configurable in a .src file.
Configure InfluxDB 2.x and Cloud connections with CLI flags
or in the Chronograf UI.
Create a new file named example.src (the filename is arbitrary) and place it at Chronograf’s resource-path.
All .src files should contain the following:
{
  "id": "10000",
  "name": "My InfluxDB",
  "username": "test",
  "password": "test",
  "url": "http://localhost:8086",
  "type": "influx",
  "insecureSkipVerify": false,
  "default": true,
  "telegraf": "telegraf",
  "organization": "example_org"
}id
A unique, stringified non-negative integer. Using a 4 or 5 digit number is recommended to avoid interfering with existing datasource IDs.
name
Any string you want to use as the display name of the source.
username
Username used to access the InfluxDB server or cluster. Only required if authorization is enabled on the InfluxDB instance to which you’re connecting.
password
Password used to access the InfluxDB server or cluster. Only required if authorization is enabled on the InfluxDB instance to which you’re connecting.
url
URL of the InfluxDB server or cluster.
type
Defines the type or distribution of InfluxDB to which you are connecting. Below are the following options:
| InfluxDB Distribution | type Value |
|---|---|
| InfluxDB OSS | influx |
| InfluxDB Enterprise | influx-enterprise |
insecureSkipVerify
Skips the SSL certificate verification process.
Set to true if you are using a self-signed SSL certificate on your InfluxDB server or cluster.
default
Set to true if you want the connection to be the default data connection used upon first login.
telegraf
The name of the Telegraf database on your InfluxDB server or cluster.
organization
The ID of the organization you want the data source to be associated with.
Environment variables in .src files
.src files support the use of environment variables to populate InfluxDB connection details.
Environment variables can be loaded using the "{{ .VARIABLE_KEY }}" syntax:
{
  "id": "10000",
  "name": "My InfluxDB",
  "username": "{{ .INFLUXDB_USER }}",
  "password": "{{ .INFLUXDB_PASS }}",
  "url": "{{ .INFLUXDB_URL }}",
  "type": "influx",
  "insecureSkipVerify": false,
  "default": true,
  "telegraf": "telegraf",
  "organization": "example_org"
}Manage Kapacitor connections using the Chronograf UI
Kapacitor is the data processing component of the TICK stack. To use Kapacitor in Chronograf, create Kapacitor connections and configure alert endpoints. To create a Kapacitor connection using the Chronograf UI:
Open Chronograf and click Configuration (wrench icon) in the navigation menu.
Next to an existing InfluxDB connection, click Add Kapacitor Connection if there are no existing Kapacitor connections or select Add Kapacitor Connection in the Kapacitor Connection dropdown list.
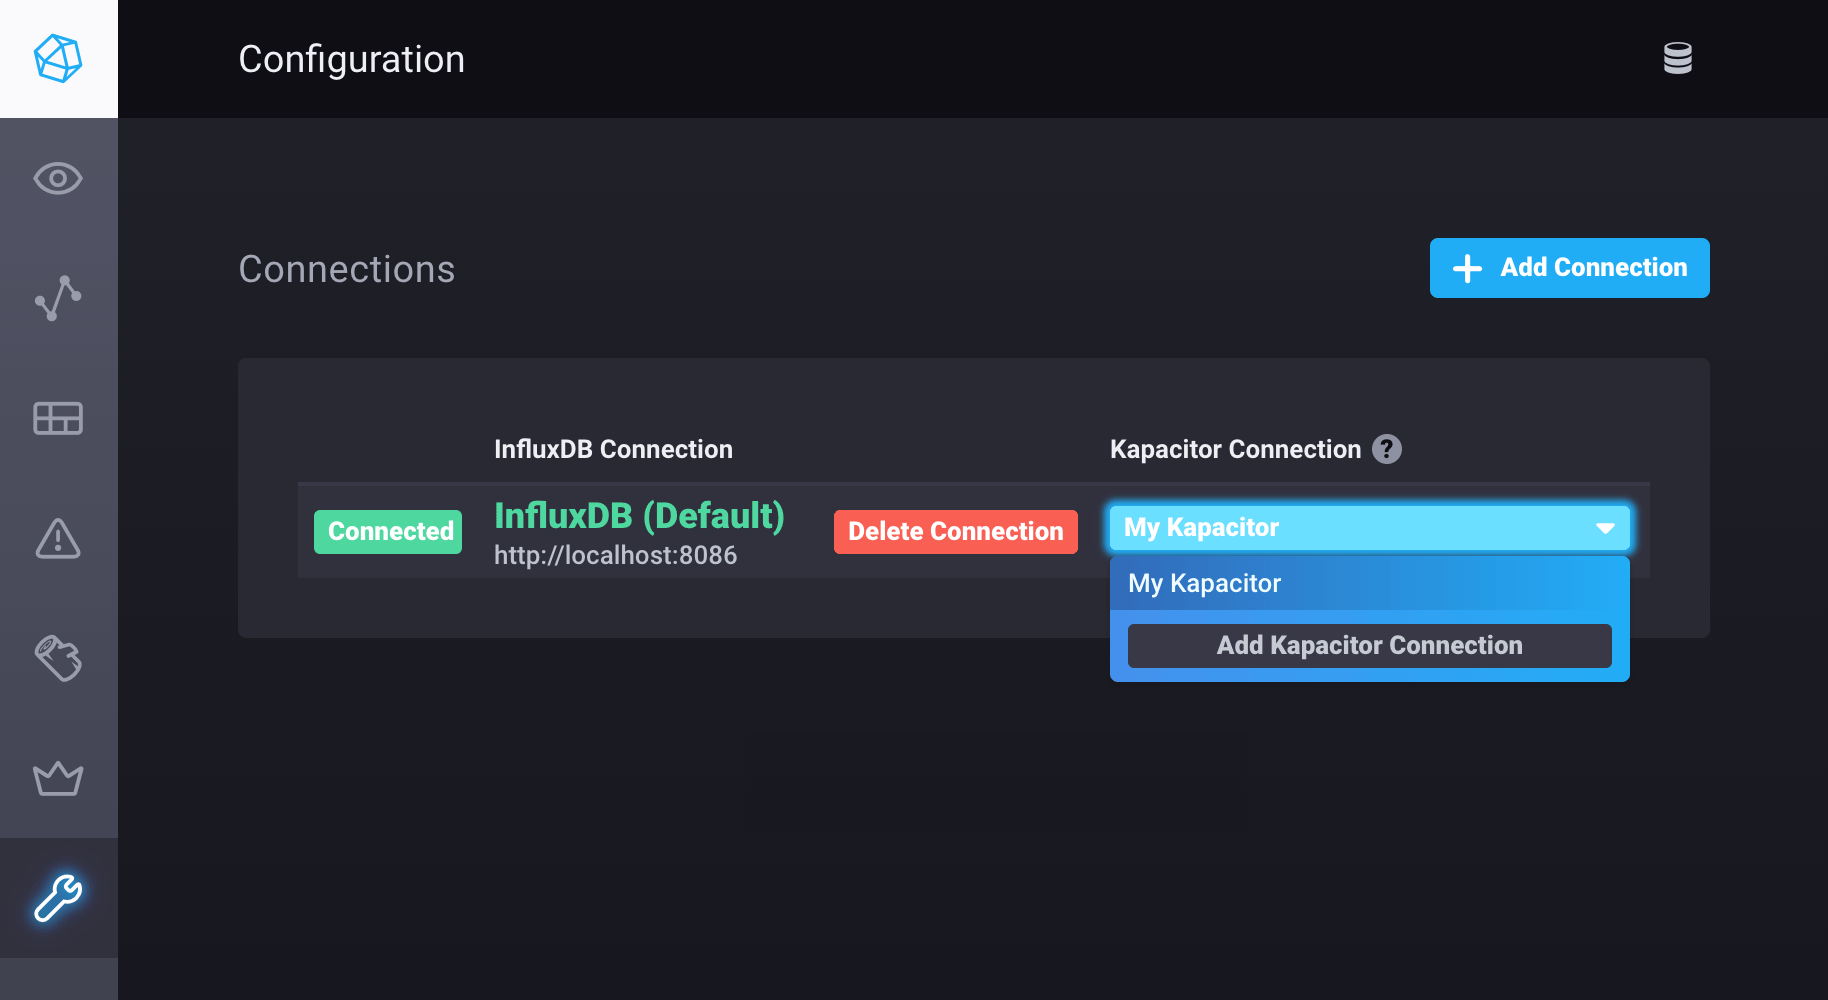
In the Connection Details section, enter values for the following fields:
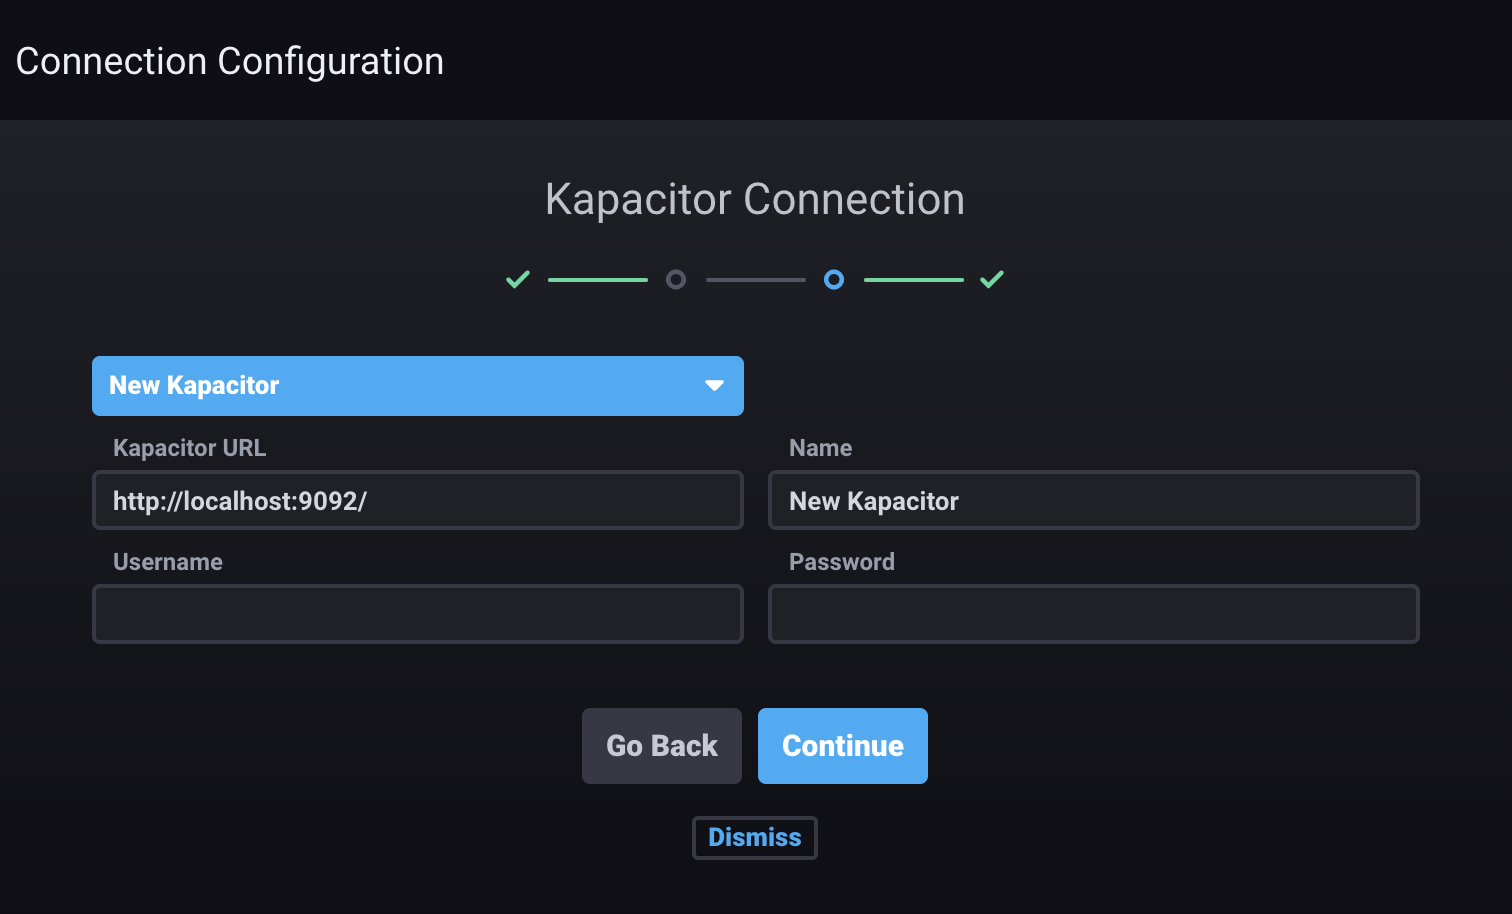
- Kapacitor URL: Enter the hostname or IP address of the Kapacitor instance and the port. The field is prefilled with
http://localhost:9092. - Name: Enter the name for this connection.
- Username: Enter the username that will be shared for this connection. Only required if authorization is enabled on the Kapacitor instance or cluster to which you’re connecting.
- Password: Enter the password. Only required if authorization is enabled on the Kapacitor instance or cluster to which you’re connecting.
- Kapacitor URL: Enter the hostname or IP address of the Kapacitor instance and the port. The field is prefilled with
Click Continue. If the connection is valid, the message “Kapacitor Created! Configuring endpoints is optional.” appears. To configure alert endpoints, see Configuring alert endpoints.
Manage Kapacitor connections using .kap files
Manually create .kap files to store Kapacitor connection details.
.kap files are simple JSON files that contain key-value paired connection details.
The location of .kap files is defined by the --resources-path command line option, which is, by default, the same as the --canned-path.
A .kap files contains the details for a single InfluxDB connection.
Create a new file named example.kap (the filename is arbitrary) and place it at Chronograf’s resource-path.
All .kap files should contain the following:
{
  "id": "10000",
  "srcID": "10000",
  "name": "My Kapacitor",
  "url": "http://localhost:9092",
  "active": true,
  "organization": "example_org"
}id
A unique, stringified non-negative integer. Using a 4 or 5 digit number is recommended to avoid interfering with existing datasource IDs.
srcID
The unique, stringified non-negative integer id of the InfluxDB server or cluster with which the Kapacitor service is associated.
name
Any string you want to use as the display name of the Kapacitor connection.
url
URL of the Kapacitor server.
active
If true, specifies that this is the Kapacitor connection that should be used when displaying Kapacitor-related information in Chronograf.
organization
The ID of the organization you want the Kapacitor connection to be associated with.
Environment variables in .kap files
.kap files support the use of environment variables to populate Kapacitor connection details.
Environment variables can be loaded using the "{{ .VARIABLE_KEY }}" syntax:
{
  "id": "10000",
  "srcID": "10000",
  "name": "My Kapacitor",
  "url": "{{ .KAPACITOR_URL }}",
  "active": true,
  "organization": "example_org"
}Was this page helpful?
Thank you for your feedback!
Support and feedback
Thank you for being part of our community! We welcome and encourage your feedback and bug reports for Chronograf and this documentation. To find support, use the following resources: