
Create a multi-node cluster
Create a multi-node InfluxDB 3 Enterprise cluster for high availability, performance, and workload isolation. Configure nodes with specific modes (ingest, query, process, compact) to optimize for your use case.
Prerequisites
- Shared object store
Basic multi-node setup
The examples in this guide assume each node runs on a distinct host and uses the default port (8181).
If you run multiple nodes on the same host for testing or development, specify a different port for each node using the --http-bind option–for example, --http-bind localhost:8282.
## NODE 1 compacts stored data

# Example variables
# node-id: 'host01'
# cluster-id: 'cluster01'
# bucket: 'influxdb-3-enterprise-storage'

influxdb3 serve \
  --node-id host01 \
  --cluster-id cluster01 \
  --mode ingest,query,compact \
  --object-store s3 \
  --bucket influxdb-3-enterprise-storage \
  --http-bind localhost:8181
 \
  --aws-access-key-id <AWS_ACCESS_KEY_ID> \
  --aws-secret-access-key <AWS_SECRET_ACCESS_KEY>
## NODE 2 handles writes and queries
# Example variables
# node-id: 'host02'
# cluster-id: 'cluster01'
# bucket: 'influxdb-3-enterprise-storage'
influxdb3 serve \
--node-id host02 \
--cluster-id cluster01 \
--mode ingest,query \
--object-store s3 \
--bucket influxdb-3-enterprise-storage \
--aws-access-key-id AWS_ACCESS_KEY_ID \
--aws-secret-access-key AWS_SECRET_ACCESS_KEYLearn how to set up a multi-node cluster for different use cases, including high availability, read replicas, processing data, and workload isolation.
- Create an object store
- Connect to your object store
- Server modes
- Cluster configuration examples
- Writing and querying in multi-node clusters
Create an object store
With the InfluxDB 3 Enterprise diskless architecture, all data is stored in a common object store. In a multi-node cluster, you connect all nodes to the same object store.
Enterprise supports the following object stores:
- AWS S3 (or S3-compatible)
- Azure Blob Storage
- Google Cloud Storage
Refer to your object storage provider’s documentation for setting up an object store.
Connect to your object store
When starting your InfluxDB 3 Enterprise node, include provider-specific options for connecting to your object store–for example:
To use an AWS S3 or S3-compatible object store, provide the following options
with your influxdb3 serve command:
--object-store:s3--bucket: Your AWS S3 bucket name--aws-access-key-id: Your AWS access key ID
(can also be defined using theAWS_ACCESS_KEY_IDenvironment variable)--aws-secret-access-key: Your AWS secret access key
(can also be defined using theAWS_SECRET_ACCESS_KEYenvironment variable)
influxdb3 serve \
  # ...
  --object-store s3 \
  --bucket AWS_BUCKET_NAME \
  --aws-access-key-id AWS_ACCESS_KEY_ID \
  --aws-secret-access-key AWS_SECRET_ACCESS_KEY
For information about other S3-specific settings, see Configuration options - AWS.
To use Azure Blob Storage as your object store, provide the following options
with your influxdb3 serve command:
--object-store:azure--bucket: Your Azure Blob Storage container name--azure-storage-account: Your Azure Blob Storage account name
(can also be defined using theAZURE_STORAGE_ACCOUNTenvironment variable)--azure-storage-access-key: Your Azure Blob Storage access key
(can also be defined using theAZURE_STORAGE_ACCESS_KEYenvironment variable)
influxdb3 serve \
  # ...
  --object-store azure \
  --bucket AZURE_CONTAINER_NAME \
  --azure-storage-account AZURE_STORAGE_ACCOUNT \
  --azure-storage-access-key AZURE_STORAGE_ACCESS_KEY
To use Google Cloud Storage as your object store, provide the following options
with your influxdb3 serve command:
--object-store:google--bucket: Your Google Cloud Storage bucket name--google-service-account: The path to your Google credentials JSON file (can also be defined using theGOOGLE_SERVICE_ACCOUNTenvironment variable)
influxdb3 serve \
  # ...
  --object-store google \
  --bucket GOOGLE_BUCKET_NAME \
  --google-service-account GOOGLE_SERVICE_ACCOUNT
Server modes
InfluxDB 3 Enterprise modes determine what subprocesses the Enterprise node runs. These subprocesses fulfill required tasks including data ingestion, query processing, compaction, and running the processing engine.
The influxdb3 serve --mode option defines what subprocesses a node runs.
Each node can run in one or more of the following modes:
all (default): Runs all necessary subprocesses.
ingest: Runs the data ingestion subprocess to handle writes.
query: Runs the query processing subprocess to handle queries.
process: Runs the processing engine subprocess to trigger and execute plugins.
compact: Runs the compactor subprocess to optimize data in object storage.
Only one node in your cluster can run in
compactmode.
Server mode examples
Configure a node to only handle write requests
influxdb3 serve \
  # ...
  --mode ingest
Configure a node to only run the Compactor
influxdb3 serve \
  # ...
  --mode compact
Configure a node to handle queries and run the processing engine
influxdb3 serve \
  # ...
  --mode query,process
When using process mode, you must also specify --plugin-dir to configure
the Python plugin environment. Without this flag, starting a node with process
mode will fail with an error. See the plugin-dir configuration option
for more information.
Cluster configuration examples
- High availability cluster
- High availability with a dedicated Compactor
- High availability with read replicas and a dedicated Compactor
High availability cluster
A minimum of two nodes are required for basic high availability (HA), with both nodes reading and writing data.
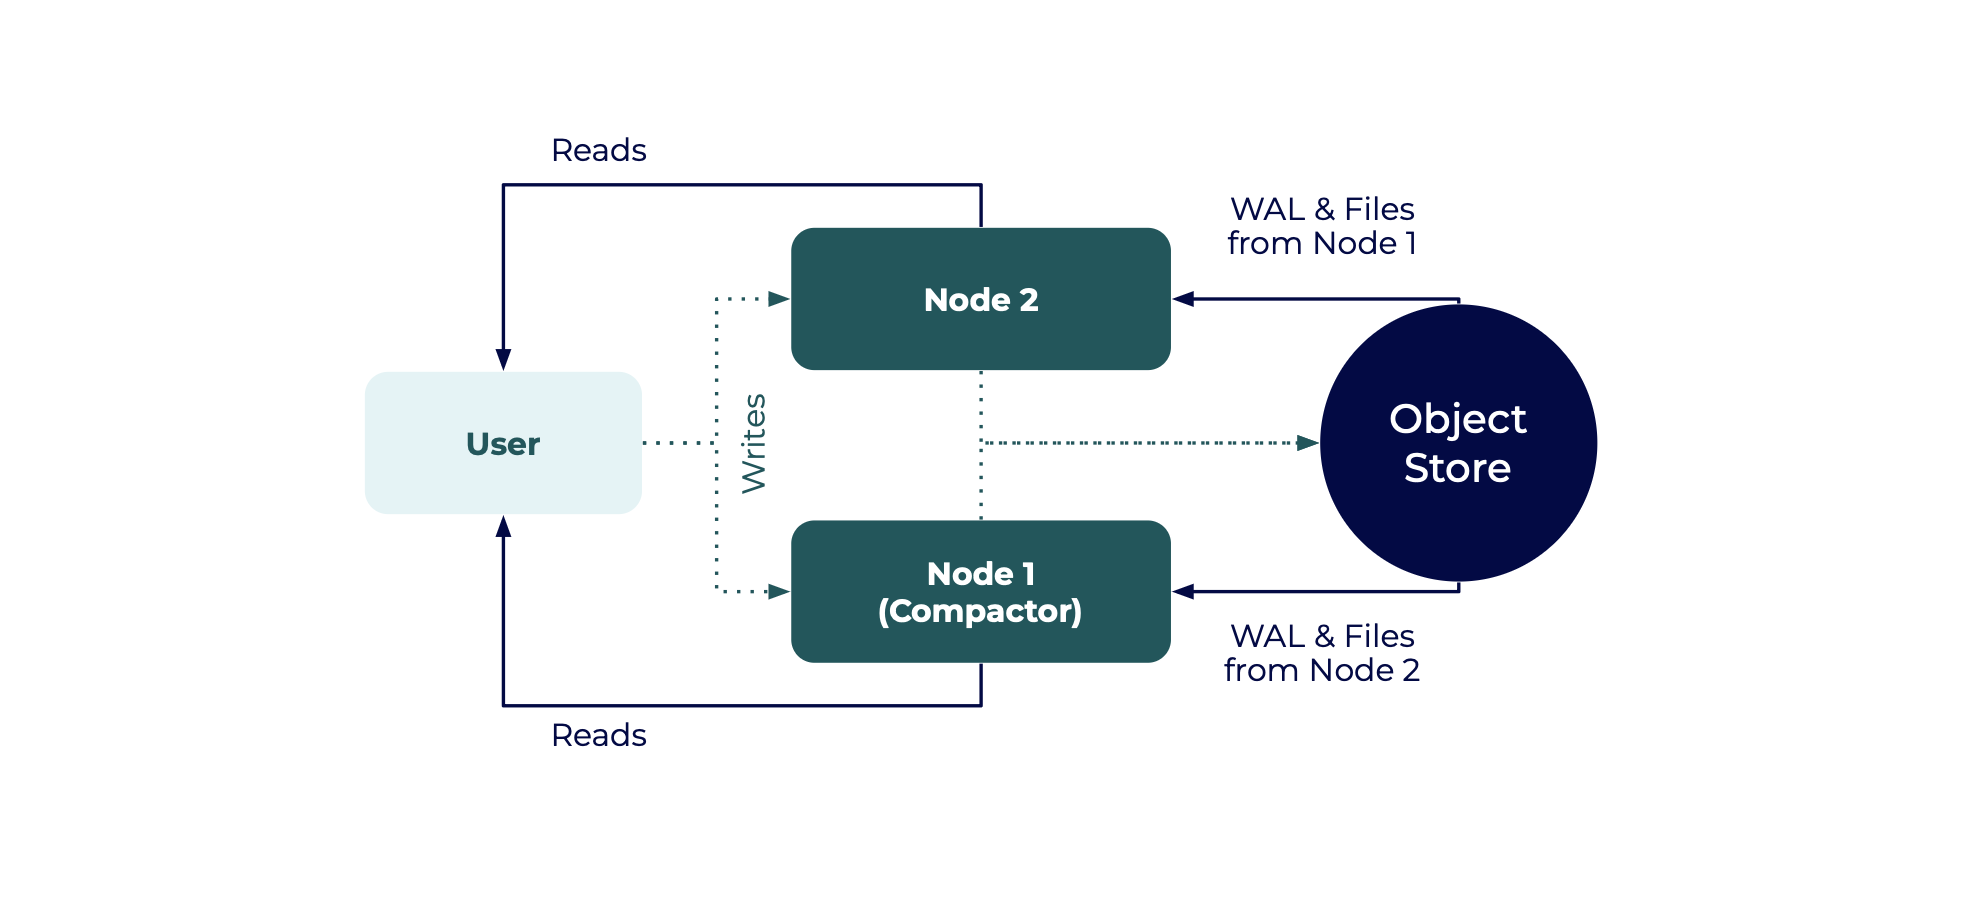
In a basic HA setup:
- Two nodes both write data to the same object store and both handle queries
- Node 1 and Node 2 are read replicas that read from each other’s object store directories
- One of the nodes is designated as the Compactor node
Only one node can be designated as the Compactor. Compacted data is meant for a single writer, and many readers.
The following examples show how to configure and start two nodes for a basic HA setup.
- Node 1 is for compaction
- Node 2 is for ingest and query
## NODE 1

# Example variables
# node-id: 'host01'
# cluster-id: 'cluster01'
# bucket: 'influxdb-3-enterprise-storage'

influxdb3 serve \
  --node-id host01 \
  --cluster-id cluster01 \
  --mode ingest,query,compact \
  --object-store s3 \
  --bucket influxdb-3-enterprise-storage \
  --http-bind localhost:8181
 \
  --aws-access-key-id <AWS_ACCESS_KEY_ID> \
  --aws-secret-access-key <AWS_SECRET_ACCESS_KEY>
## NODE 2
# Example variables
# node-id: 'host02'
# cluster-id: 'cluster01'
# bucket: 'influxdb-3-enterprise-storage'
influxdb3 serve \
--node-id host02 \
--cluster-id cluster01 \
--mode ingest,query \
--object-store s3 \
--bucket influxdb-3-enterprise-storage \
--aws-access-key-id AWS_ACCESS_KEY_ID \
--aws-secret-access-key AWS_SECRET_ACCESS_KEYAfter the nodes have started, querying either node returns data for both nodes, and NODE 1 runs compaction. To add nodes to this setup, start more read replicas with the same cluster ID.
High availability with a dedicated Compactor
Data compaction in InfluxDB 3 Enterprise is one of the more computationally demanding operations. To ensure stable performance in ingest and query nodes, set up a compactor-only node to isolate the compaction workload.

The following examples sets up high availability with a dedicated Compactor node:
Start two read-write nodes as read replicas, similar to the previous example.
## NODE 1 — Writer/Reader Node #1

# Example variables
# node-id: 'host01'
# cluster-id: 'cluster01'
# bucket: 'influxdb-3-enterprise-storage'

influxdb3 serve \
  --node-id host01 \
  --cluster-id cluster01 \
  --mode ingest,query \
  --object-store s3 \
  --bucket influxdb-3-enterprise-storage \
  --http-bind localhost:8181
 \
  --aws-access-key-id <AWS_ACCESS_KEY_ID> \
  --aws-secret-access-key <AWS_SECRET_ACCESS_KEY>
## NODE 2 — Writer/Reader Node #2 # Example variables # node-id: 'host02' # cluster-id: 'cluster01' # bucket: 'influxdb-3-enterprise-storage' influxdb3 serve \ --node-id host02 \ --cluster-id cluster01 \ --mode ingest,query \ --object-store s3 \ --bucket influxdb-3-enterprise-storage \ --aws-access-key-id <AWS_ACCESS_KEY_ID> \ --aws-secret-access-key <AWS_SECRET_ACCESS_KEY>Start the dedicated compactor node with the
--mode=compactoption to ensure the node only runs compaction.## NODE 3 — Compactor Node # Example variables # node-id: 'host03' # cluster-id: 'cluster01' # bucket: 'influxdb-3-enterprise-storage' influxdb3 serve \ --node-id host03 \ --cluster-id cluster01 \ --mode compact \ --object-store s3 \ --bucket influxdb-3-enterprise-storage \ --aws-access-key-id <AWS_ACCESS_KEY_ID> \ --aws-secret-access-key <AWS_SECRET_ACCESS_KEY>
High availability with read replicas and a dedicated Compactor
For a robust and effective setup for managing time-series data, you can run ingest nodes alongside query nodes and a dedicated Compactor node.
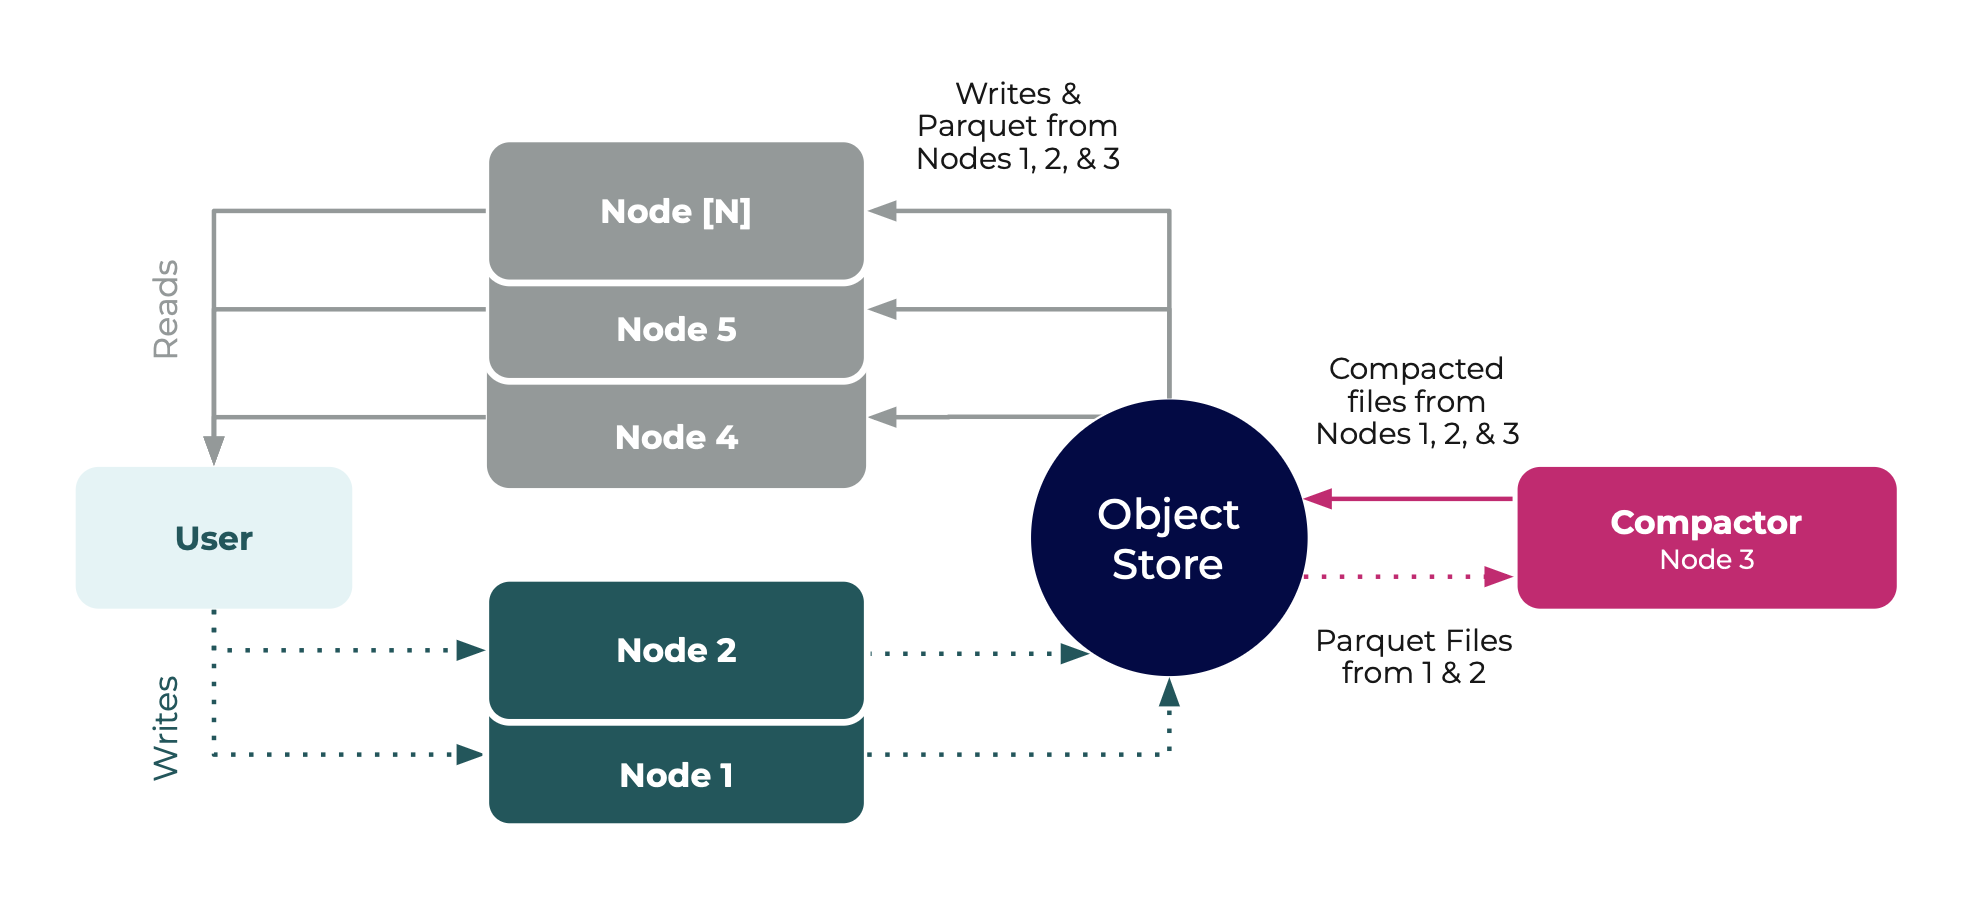
Start ingest nodes with the
ingestmode.Send all write requests to only your ingest nodes.
## NODE 1 — Writer Node #1

# Example variables
# node-id: 'host01'
# cluster-id: 'cluster01'
# bucket: 'influxdb-3-enterprise-storage'

influxdb3 serve \
  --node-id host01 \
  --cluster-id cluster01 \
  --mode ingest \
  --object-store s3 \
  --bucket influxdb-3-enterprise-storage \
  --http-bind localhost:8181
 \
  --aws-access-key-id <AWS_ACCESS_KEY_ID> \
  --aws-secret-access-key <AWS_SECRET_ACCESS_KEY>
## NODE 2 — Writer Node #2 # Example variables # node-id: 'host02' # cluster-id: 'cluster01' # bucket: 'influxdb-3-enterprise-storage' influxdb3 serve \ --node-id host02 \ --cluster-id cluster01 \ --mode ingest \ --object-store s3 \ --bucket influxdb-3-enterprise-storage \ --aws-access-key-id <AWS_ACCESS_KEY_ID> \ --aws-secret-access-key <AWS_SECRET_ACCESS_KEY>Start the dedicated Compactor node with the
compactmode.## NODE 3 — Compactor Node # Example variables # node-id: 'host03' # cluster-id: 'cluster01' # bucket: 'influxdb-3-enterprise-storage' influxdb3 serve \ --node-id host03 \ --cluster-id cluster01 \ --mode compact \ --object-store s3 \ --bucket influxdb-3-enterprise-storage \ --aws-access-key-id <AWS_ACCESS_KEY_ID> \ <AWS_SECRET_ACCESS_KEY>Finally, start the query nodes using the
querymode.Send all query requests to only your query nodes.
## NODE 4 — Read Node #1

# Example variables
# node-id: 'host04'
# cluster-id: 'cluster01'
# bucket: 'influxdb-3-enterprise-storage'

influxdb3 serve \
  --node-id host04 \
  --cluster-id cluster01 \
  --mode query \
  --object-store s3 \
  --bucket influxdb-3-enterprise-storage \
  --aws-access-key-id <AWS_ACCESS_KEY_ID> \
  --aws-secret-access-key <AWS_SECRET_ACCESS_KEY>
## NODE 5 — Read Node #2 # Example variables # node-id: 'host05' # cluster-id: 'cluster01' # bucket: 'influxdb-3-enterprise-storage' influxdb3 serve \ --node-id host05 \ --cluster-id cluster01 \ --mode query \ --object-store s3 \ --bucket influxdb-3-enterprise-storage \ --aws-access-key-id <AWS_ACCESS_KEY_ID> \ <AWS_SECRET_ACCESS_KEY>
Writing and querying in multi-node clusters
You can use the default port 8181 for any write or query request without
changing any of the commands.
Specify hosts for write and query requests
To benefit from this multi-node, isolated architecture:
- Send write requests to a node that you have designated as an ingester.
- Send query requests to a node that you have designated as a querier.
When running multiple local instances for testing or separate nodes in production, specifying the host ensures writes and queries are routed to the correct instance.
# Example querying a specific host
# HTTP-bound Port: 8585
influxdb3 query \
  --host http://localhost:8585
  --token AUTH_TOKEN \
  --database DATABASE_NAME \
  "QUERY"
Replace the following placeholders with your values:
http://localhost:8585: the host and port of the node to queryAUTH_TOKEN: your database token with permission to query the specified databaseDATABASE_NAME: the name of the database to queryQUERY: the SQL or InfluxQL query to run against the database
Was this page helpful?
Thank you for your feedback!
Support and feedback
Thank you for being part of our community! We welcome and encourage your feedback and bug reports for InfluxDB 3 Enterprise and this documentation. To find support, use the following resources:
Customers with an annual or support contract can contact InfluxData Support. Customers using a trial license can email trial@influxdata.com for assistance.