
Configure OIDC authentication
OIDC authentication signs users in through an OpenID Connect identity provider using authorization code flow with PKCE. Telegraf Controller reads identity claims from the ID token and uses them to assign roles and provision accounts.
Available with Telegraf Enterprise
OIDC authentication is only available with Telegraf Enterprise. If you are interested in learning more about Telegraf Enterprise, contact us.
- Prerequisites
- Register a client with your OIDC provider
- Configure OIDC at startup
- Configure provisioning
- Configure group-to-role mapping
- Bootstrap the owner against OIDC
- Provider examples
- Disable OIDC
- Audit events
Prerequisites
- A valid Telegraf Enterprise license applied to your Telegraf Controller instance.
- An OIDC-compliant identity provider that supports authorization code flow with PKCE (S256).
- A registered OIDC client in your identity provider with a redirect URI
that ends with
/api/auth/oidc/callback. - Permission to modify the Telegraf Controller startup environment.
- The Owner role to change OIDC settings from the Settings page.
OIDC transport settings change only at startup
Issuer, client credentials, scopes, claims, and callback are read at startup and cannot be changed at runtime. Provisioning, default role, allowed domains, and group-to-role mappings are runtime-editable from the Settings page.
MFA and SSO are enforced by your OIDC provider
Telegraf Controller does not implement multi-factor authentication or single sign-on directly. Both are delegated to your OIDC provider during the authorization step. Users already signed into the provider get single sign-on automatically; users subject to an MFA policy complete that challenge before Telegraf Controller receives the ID token. Configure MFA and SSO in your identity provider, not in Telegraf Controller.
Register a client with your OIDC provider
Before configuring Telegraf Controller, create a client (also called an application or integration) in your identity provider with the following properties:
- Flow: Authorization code with PKCE (S256). Telegraf Controller always uses PKCE and does not accept a provider that requires implicit or hybrid flows.
- Redirect URI: The base URL of your Telegraf Controller instance
followed by
/api/auth/oidc/callback. Example:https://controller.example.com/api/auth/oidc/callback. - Scopes: At minimum
openid,profile, andemail. Include any provider-specific scope required to emit a groups claim. - Claims: Ensure the ID token includes a stable subject (
sub), the user’s email (email), and a groups list (default claim namegroups).
Copy the client ID and client secret from the provider. You will pass them to Telegraf Controller in the next step.
Configure OIDC at startup
Set the OIDC environment variables before starting Telegraf Controller.
| Variable | Description | Required |
|---|---|---|
AUTH_OIDC_ENABLED | Set to true to enable OIDC authentication. | Yes |
AUTH_OIDC_ISSUER | Provider’s issuer URL. | Yes |
AUTH_OIDC_CLIENT_ID | OAuth2 client identifier registered with the provider. | Yes |
AUTH_OIDC_CLIENT_SECRET | OAuth2 client secret. | Yes |
AUTH_OIDC_REDIRECT_URI | Callback URL ending with /api/auth/oidc/callback. | Yes |
AUTH_OIDC_SCOPES | Space-separated OAuth2 scopes. openid is added automatically. | No |
AUTH_OIDC_USERNAME_CLAIM | ID-token claim used as the Telegraf Controller username. | No |
AUTH_OIDC_GROUPS_CLAIM | ID-token claim that contains the user’s groups. | No |
AUTH_OIDC_DISPLAY_NAME | Friendly name shown on the Sign in with… button. | No |
AUTH_OIDC_POST_LOGIN_REDIRECT | Path inside Telegraf Controller to redirect to after sign-in. | No |
AUTH_OIDC_ALLOW_INSECURE | Allow http:// issuers and callbacks. Development only. | No |
For the full description of each variable, including defaults, see Authentication and security configuration options.
Apply the configuration
Add the OIDC variables to your systemd unit file (typically
/etc/systemd/system/telegraf-controller.service):
[Service]
Environment=AUTH_OIDC_ENABLED=true
Environment=AUTH_OIDC_ISSUER=https://idp.example.com
Environment=AUTH_OIDC_CLIENT_ID=telegraf-controller
Environment=AUTH_OIDC_CLIENT_SECRET=<client-secret>
Environment=AUTH_OIDC_REDIRECT_URI=https://controller.example.com/api/auth/oidc/callback
Environment=AUTH_OIDC_DISPLAY_NAME=Example IdP
Reload systemd and restart the service:
sudo systemctl daemon-reload
sudo systemctl restart telegraf-controller
Export the variables, or pass equivalent flags on the command line:
export AUTH_OIDC_ENABLED=true
export AUTH_OIDC_ISSUER=https://idp.example.com
export AUTH_OIDC_CLIENT_ID=telegraf-controller
export AUTH_OIDC_CLIENT_SECRET='<client-secret>'
export AUTH_OIDC_REDIRECT_URI=https://controller.example.com/api/auth/oidc/callback
export AUTH_OIDC_DISPLAY_NAME='Example IdP'

telegraf_controller --no-interactive
Set the variables in PowerShell, or pass equivalent flags on the command line:
$env:AUTH_OIDC_ENABLED="true"
$env:AUTH_OIDC_ISSUER="https://idp.example.com"
$env:AUTH_OIDC_CLIENT_ID="telegraf-controller"
$env:AUTH_OIDC_CLIENT_SECRET="<client-secret>"
$env:AUTH_OIDC_REDIRECT_URI="https://controller.example.com/api/auth/oidc/callback"
$env:AUTH_OIDC_DISPLAY_NAME="Example IdP"

./telegraf_controller.exe --no-interactive
After Telegraf Controller starts, sign in as an owner and confirm:
- Settings > OIDC Authentication shows the redacted configuration and reports the issuer as discovered.
- The sign-in page shows a Sign in with
<display-name>button.
Call the public status endpoint to confirm the provider is registered:
curl -s http://localhost:8888/api/auth/status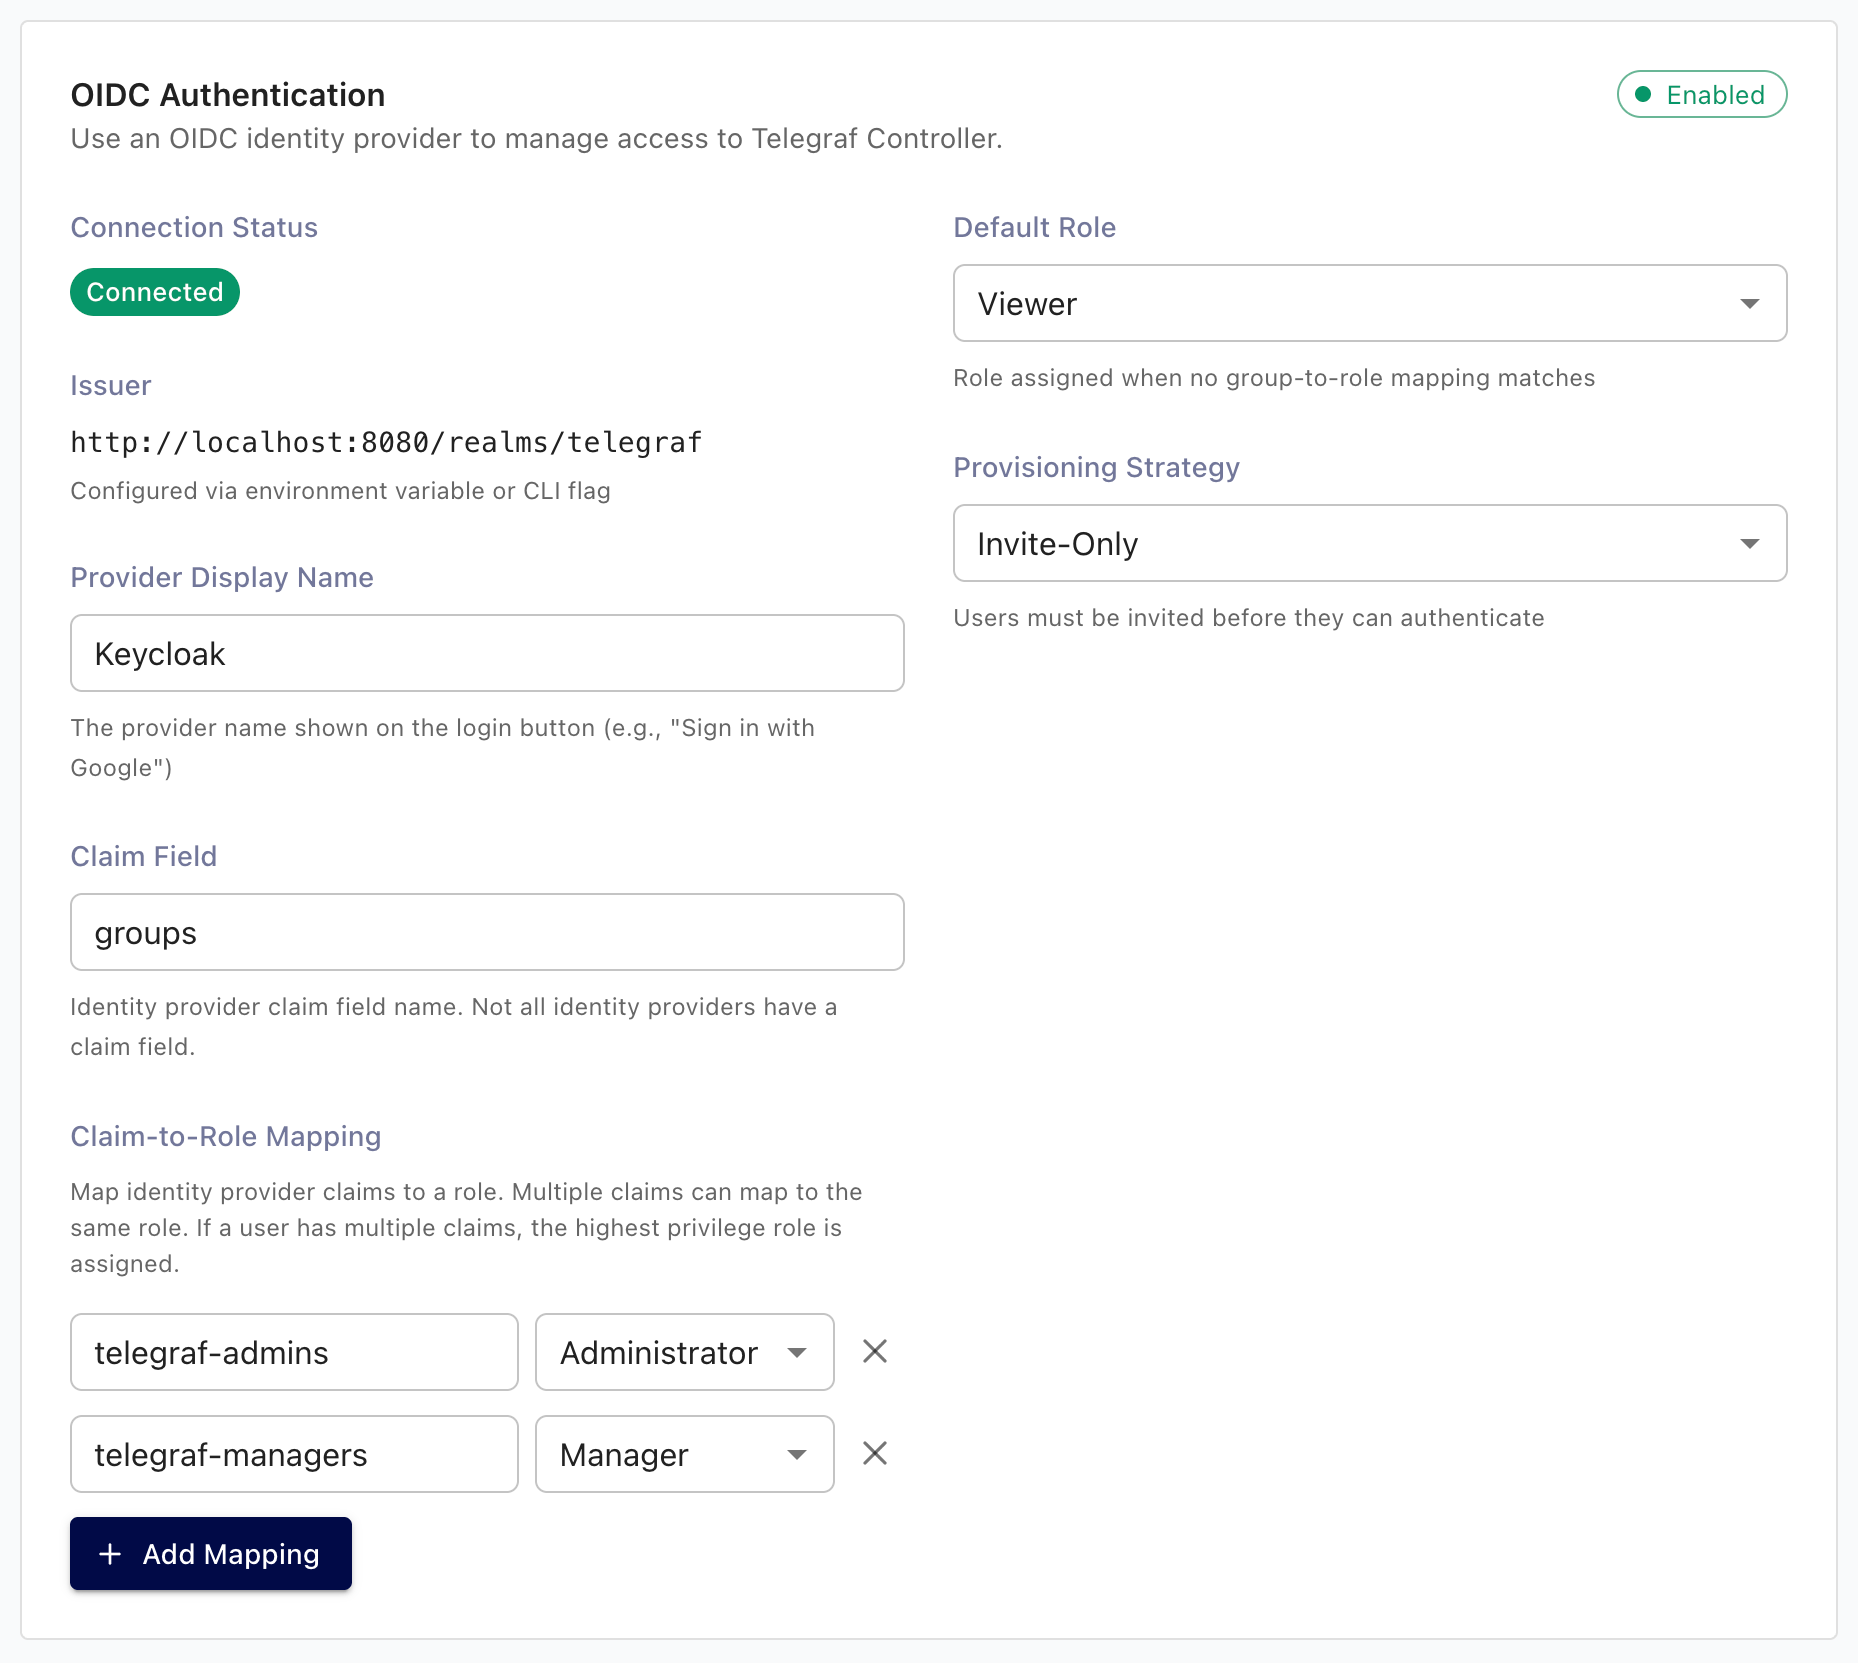
Configure provisioning
Provisioning rules decide what happens the first time an OIDC user signs in. Configure them on the Settings > OIDC Authentication panel.
| Setting | Description | Default |
|---|---|---|
| Provisioning strategy | invite_only, domain_restricted, or auto_create. See Provisioning strategies. | invite_only |
| Default role | Role assigned when no group mapping matches the user. | viewer |
| Allowed email domains | Comma-separated list, required when the strategy is domain_restricted. | (none) |
| Auto-link by verified email | When enabled, link an OIDC user to an existing local user whose email is verified and matches. | Disabled |
| On no group match | use_default_role admits the user with the default role; reject denies the sign-in. | use_default_role |
| Display name | Overrides AUTH_OIDC_DISPLAY_NAME on the sign-in button. | Env value |
| Groups claim | Overrides AUTH_OIDC_GROUPS_CLAIM for incoming tokens. | Env value |
To update provisioning settings:
- Sign in as an Owner or Administrator.
- Navigate to the Settings page.
- In the OIDC Authentication section, update the values.
- Click Save.
The new values take effect on the next sign-in attempt.
Configure group-to-role mapping
Group-to-role mappings translate values from the OIDC groups claim into Telegraf Controller roles.
- On the Settings page, scroll to OIDC Authentication > Group role mappings.
- Click Add mapping and provide:
- Provider ID: a label that identifies the OIDC provider
instance. Use the default
defaultunless you run multiple providers. - Group name: the exact string the provider emits in the
groups claim (for example
telegraf-admins). - Role:
administrator,manager, orviewer.
- Provider ID: a label that identifies the OIDC provider
instance. Use the default
- Click Save.
When a user signs in, Telegraf Controller matches each group in the token against the mappings and assigns the highest matching role. Users without a matching group fall back to Default role or are rejected, depending on On no group match.
Owner role is not assignable through mappings
The Owner role is reserved for the bootstrap owner and accounts created by Transfer ownership. Group mappings cannot promote a user to Owner.
Bootstrap the owner against OIDC
You only need to bootstrap an OIDC-backed owner if you plan to disable local authentication. Otherwise, the default local owner can administer OIDC from the Settings page without limitation.
On first startup, set both of the following alongside the standard owner variables:
export OWNER_AUTH_PROVIDER=oidc
export OWNER_EXTERNAL_ID='00u1a2b3c4d5e6f7g8h9'| Variable | Description |
|---|---|
OWNER_AUTH_PROVIDER | Set to oidc to bootstrap the owner with OIDC as the primary provider. |
OWNER_EXTERNAL_ID | The user’s subject claim (sub) from the OIDC provider. This must match the sub value in the ID token returned at sign-in. |
The owner can sign in through OIDC and also retains a local password hash as a recovery credential. See Configure local authentication for the disable-local procedure.
Provider examples
The values shown for each provider are starting points. Use the redirect URI for your own Telegraf Controller installation and confirm that the groups claim you choose is actually emitted by your provider.
Disable OIDC
To disable OIDC authentication, remove AUTH_OIDC_ENABLED (or set it to a
value other than true) and restart Telegraf Controller.
GET /api/auth/oidc/loginreturns403 Forbiddenafter restart.- Existing OIDC-provisioned user accounts remain in the database. They cannot sign in through OIDC until OIDC is re-enabled, but they continue to appear in the Users list.
- API tokens issued to OIDC users continue to work until the owning user is disabled or deleted.
Audit events
OIDC sign-in and sign-out emit the following audit events. They appear in the audit log when audit logging is enabled.
| Event | Description |
|---|---|
user.login | Recorded after a successful OIDC callback. |
user.logout | Recorded when a user signs out. |
For details on enabling and reviewing audit events, see Audit logs.
Was this page helpful?
Thank you for your feedback!
Support and feedback
Thank you for being part of our community! We welcome and encourage your feedback and bug reports for Telegraf and this documentation. To find support, use the following resources:
Customers with an annual or support contract can contact InfluxData Support.