Security
Overview
This document covers the basics of securing the open-source distribution of Kapacitor.
When seeking to secure Kapacitor it is assumed that the Kapacitor server will be communicating with an already secured InfluxDB server. It will also make its tasks and alerts available to a Chronograf installation.
The following discussion will cover configuring Kapacitor to communicate with a secure InfluxDB server, enabling TLS in Kapacitor and connecting a TLS enabled Kapacitor server to Chronograf.
Authentication and Authorization are not fully implemented in the open-source Kapacitor distribution, but are available as a feature of Enterprise Kapacitor.
Secure InfluxDB and Kapacitor
InfluxDB can secure its communications with TLS on the transport layer and with authentication into the database. How to enable TLS and authentication and authorization in InfluxDB is covered in the InfluxDB documentation, in the sections HTTPS Setup and Authentication and Authorization respectively.
Kapacitor configuration supports both HTTPS communications and Authentication with InfluxDB. Parameters can be set directly in the configuration file, as environment variables or over Kapacitor’s HTTP API.
An overview of Kapacitor configuration is provided in the Configuration document.
Kapacitor and InfluxDB HTTPS
To activate a TLS connection the urls strings in the influxdb servers
configuration will need to contain the https protocol. Furthermore either a
PEM encoded public key and certificate pair or a PEM encoded CA file will need
to be specified.
When testing with a self-signed certificate it is also important to switch off
certificate verification with the property insecure-skip-verify. Failure to do
so will result in x509 certificate errors as follows:
ts=2018-02-19T13:26:11.437+01:00 lvl=error msg="failed to connect to InfluxDB, retrying..." service=influxdb cluster=localhost err="Get https://localhost:8086/ping: x509: certificate is valid for lenovo-TP02, not localhost"Important – Please note that in a production environment with a standard CA certificate, insecure-skip-verify needs to be switched on.
In the configuration file these values are set according to the following example.
Example 1 – TLS Configuration Properties for InfluxDB – kapacitor.conf
[[influxdb]]
  # Connect to an InfluxDB cluster
  # Kapacitor can subscribe, query and write to this cluster.
  # Using InfluxDB is not required and can be disabled.
  enabled = true
  default = true
  name = "localhost"
  urls = ["https://localhost:8086"]
  timeout = 0
  # Absolute path to pem encoded CA file.
  # A CA can be provided without a key/cert pair
  #   ssl-ca = "/etc/ssl/influxdata-selfsigned-incl-pub-key.pem"
  # Absolutes paths to pem encoded key and cert files.
     ssl-cert = "/etc/ssl/influxdb-selfsigned.crt"
     ssl-key = "/etc/ssl/influxdb-selfsigned.key"
...
   insecure-skip-verify = false
...
   subscription-protocol = "https"
...
The relevant properties in Example 1 are:
urls– note the protocol ishttpsand nothttp.ssl-certandssl-key– to indicate the location of the certificate and key files.insecure-skip-verify– for testing with a self-signed certificate set this totrueotherwise it should befalse, especially in production environments.subscription-protocol– to declare the correct protocol for subscription communications. For example if Kapacitor is to run on HTTP then this should be set to"http", however if Kapacitor is to run on “HTTPS” then this should be set to"https".
Note that when a CA file contains the certificate and key together the property
ssl-ca can be used in place of ssl-cert and ssl-key.
As environment variables these properties can be set as follows:
Example 2 – TLS Configuration Properties for InfluxDB – ENVARS
KAPACITOR_INFLUXDB_0_URLS_0="https://localhost:8086"
KAPACITOR_INFLUXDB_0_SSL_CERT="/etc/ssl/influxdb-selfsigned.crt"
KAPACITOR_INFLUXDB_0_SSL_KEY="/etc/ssl/influxdb-selfsigned.key"
KAPACITOR_INFLUXDB_0_INSECURE_SKIP_VERIFY=true
KAPACITOR_INFLUXDB_0_SUBSCRIPTION_PROTOCOL="https"
When using Systemd to manage the Kapacitor daemon the above parameters can be
stored in the file /etc/default/kapacitor.
Kapacitor to InfluxDB TLS configuration over HTTP API
These properties can also be set using the HTTP API. To get the current
InfluxDB part of the Kapacitor configuration, use the following curl command:
curl -ks http://localhost:9092/kapacitor/v1/config/influxdb | python -m json.tool > kapacitor-influxdb.confThis results in the following file:
Example 3 – The InfluxDB part of the Kapacitor configuration
{
    "elements": [
        {
            "link": {
                "href": "/kapacitor/v1/config/influxdb/localhost",
                "rel": "self"
            },
            "options": {
                "default": true,
                "disable-subscriptions": false,
                "enabled": true,
                "excluded-subscriptions": {
                    "_kapacitor": [
                        "autogen"
                    ]
                },
                "http-port": 0,
                "insecure-skip-verify": false,
                "kapacitor-hostname": "",
                "name": "localhost",
                "password": true,
                "ssl-ca": "",
                "ssl-cert": "/etc/ssl/influxdb-selfsigned.crt",
                "ssl-key": "/etc/ssl/influxdb-selfsigned.key",
                "startup-timeout": "5m0s",
                "subscription-mode": "cluster",
                "subscription-protocol": "https",
                "subscription-path": "",
                "subscriptions": {},
                "subscriptions-sync-interval": "1m0s",
                "timeout": "0s",
                "udp-bind": "",
                "udp-buffer": 1000,
                "udp-read-buffer": 0,
                "urls": [
                    "https://localhost:8086"
                ],
                "username": "admin"
            },
            "redacted": [
                "password"
            ]
        }
    ],
    "link": {
        "href": "/kapacitor/v1/config/influxdb",
        "rel": "self"
    }
}
Properties can be updated by POSTing a JSON document containing the field `“set”`` followed by the properties to be modified.
For example, the following command switches off the insecure-skip-verify property.
curl -kv -d '{ "set": { "insecure-skip-verify": false } }' http://localhost:9092/kapacitor/v1/config/influxdb/
...
upload completely sent off: 43 out of 43 bytes
< HTTP/1.1 204 No Content
< Content-Type: application/json; charset=utf-8
< Request-Id: 189e9abb-157b-11e8-866a-000000000000
< X-Kapacitor-Version: 1.8.2~n201802140813
< Date: Mon, 19 Feb 2018 13:45:07 GMT
<
* Connection #0 to host localhost left intact
Similar commands:
To change the URLS:
curl -kv -d '{ "set": { "urls": [ "https://lenovo-TP02:8086" ]} }' https://localhost:9092/kapacitor/v1/config/influxdb/To set the
subscription-protocol:curl -kv -d '{ "set": { "subscription-protocol": "https" } }' https://localhost:9092/kapacitor/v1/config/influxdb/If Kapacitor is behind a reverse proxy, set the
subscription-pathto append to the InfluxDB subscription URL:curl -kv -d '{ "set": { "subscription-path": "/path/behind/reverse-proxy" } }' https://localhost:9092/kapacitor/v1/config/influxdb/To set the path to the CA Certificate:
curl -kv -d '{ "set": { "ssl-ca": "/etc/ssl/influxdata-selfsigned-incl-pub-key.pem" } }' https://localhost:9092/kapacitor/v1/config/influxdb/
Other properties can be set in a similar fashion.
Kapacitor and InfluxDB Authentication
An additional security mechanism available in InfluxDB is Authentication and Authorization. Kapacitor can be configured to communicate with InfluxDB using a username:password pair. These properties can be set in the configuration file, as environment variables or over the HTTP API.
Example 4 – InfluxDB Authentication Parameters – kapacitor.conf
[[influxdb]]
  # Connect to an InfluxDB cluster
  # Kapacitor can subscribe, query and write to this cluster.
  # Using InfluxDB is not required and can be disabled.
  enabled = true
  default = true
  name = "localhost"
  urls = ["https://localhost:8086"]
  username = "admin"
  password = "changeit"
  timeout = 0
...
The relevant parameters in Example 4 are username and password.
These can also be set as environment variables.
Example 5 – InfluxDB Authentication Parameters – ENVARS
KAPACITOR_INFLUXDB_0_USERNAME="admin"
KAPACITOR_INFLUXDB_0_PASSWORD="changeit"
When using Systemd to manage the Kapacitor daemon the above parameters can be
stored in the file /etc/defaults/kapacitor.
Alternately they can be set or updated over the HTTP API.
$ curl -kv -d '{ "set": { "username": "foo", "password": "bar" } }' https://localhost:9092/kapacitor/v1/config/influxdb/Kapacitor Security
Open-source Kapacitor offers TLS for encrypting communications to the HTTP API.
Kapacitor over TLS
This feature can be enabled in the configuration http group of the configuration.
Activation requires simply setting the property https-enabled to true and
then providing a path to a certificate with the property, https-certificate.
If your certificate’s private key is separate, specify the path to the private key
using the https-private-key property.
The following example shows how this is done in the kapacitor.conf file.
Example 6 – Enabling TLS in kapacitor.conf
[http]
  # HTTP API Server for Kapacitor
  # This server is always on,
  # it serves both as a write endpoint
  # and as the API endpoint for all other
  # Kapacitor calls.
  bind-address = ":9092"
  log-enabled = true
  write-tracing = false
  pprof-enabled = false
  https-enabled = true
  https-certificate = "/etc/ssl/influxdata-selfsigned.crt"
  https-private-key = "/etc/ssl/influxdata-selfsigned.key"
These values can also be set as environment variables as shown in the next example.
Example 7 – Enabling TLS as ENVARS
KAPACITOR_HTTP_HTTPS_ENABLED=true
KAPACITOR_HTTP_HTTPS_CERTIFICATE="/etc/ssl/influxdata-selfsigned.crt"
KAPACITOR_HTTP_HTTPS_PRIVATE_KEY="/etc/ssl/influxdata-selfsigned.key"
However, they cannot be set over the HTTP API.
Please remember, that when Kapacitor is running on HTTPS, this needs to be
reflected in the subscription-protocol property for the [[influxdb]] group
of the Kapacitor configuration. See Example 1 above. The value of
this property needs to be set to https. Failure to do so will result in
a TLS handshake error with the message oversized record received with length 21536 in the Kapacitor log as shown here:
ts=2018-02-19T13:23:49.684+01:00 lvl=error msg="2018/02/19 13:23:49 http: TLS handshake error from 127.0.0.1:49946: tls: oversized record received with length 21536\n" service=http service=httpd_server_errorsIf for any reason TLS is switched off, this property needs to be reset to http.
Failure to do so will result in the inability of InfluxDB to push subscribed
data to Kapacitor with a message in the InfluxDB log like the following:
mar 05 17:02:40 algonquin influxd[32520]: [I] 2018-03-05T16:02:40Z Post https://localhost:9092/write?consistency=&db=telegraf&precision=ns&rp=autogen: http: server gave HTTP response to HTTPS client service=subscriberKapacitor command-line client with HTTPS
Once HTTPS has been enabled the Kapacitor command line client will need to be
supplied the -url argument in order to connect. If a self-signed or other
certificate is used, which has not been added to the system certificate store,
an addition argument -skipVerify will also need to be provided.
$ kapacitor -url https://localhost:9092 -skipVerify list tasks
ID                                                 Type      Status    Executing Databases and Retention Policies
chronograf-v1-3586109e-8b7d-437a-80eb-a9c50d00ad53 stream    enabled   true      ["telegraf"."autogen"]
Kapacitor Authentication and Authorization
To ensure Kapacitor requires a username and password to connect, enable basic authentication.
To do this, set up the username, password, and auth-enabled
parameters in the [http] section of kapacitor.conf.
Kapacitor also supports using InfluxDB Enterprise to manage authentication and authorization for interactions with the Kapacitor API. For instructions, see “Set up InfluxDB Enterprise authorizations”.
Note on HTTP API Configuration and Restarting Kapacitor
Please be aware that when configuration values are set using the HTTP API, that
these values will persist in the Kapacitor database even after restart. To
switch off these overrides on restart set the property skip-config-overrides
to true either in the configuration file (kapacitor.conf) or as an
environment variable (KAPACITOR_SKIP_CONFIG_OVERRIDES).
When troubleshooting connection issues after restart, check the HTTP API, for example
at http://localhost:9092/kapacitor/v1/config.
This can be especially useful if Kapacitor to InfluxDB communications do not
seem to be respecting values seen in the file kapacitor.conf or in environment
variables.
Deny specific CIDR ranges
To deny access to Kapacitor from certain CIDR ranges
(classes of IP addresses),
use the -blacklist-cidrs flag.
Pass a comma-separated list of CIDRs to deny for most HTTP GET/POST operations:
kapacitord -blacklist-cidrs 10.0.0.0/8,0.0.0.0/32Disable specific alert handlers
Use the -disable-handlers flag to disable a set of alert handlers.
Pass a comma-separated list of handlers:
kapacitord -disable-handlers exec,httppostSecure Kapacitor and Chronograf
With Kapacitor configured with HTTPS/TLS enabled many users will want to add Kapacitor to their connection configuration in Chronograf. The primary requirement for this to work is to have the base signing certificate installed on the host where the Chronograf service is running. With most operating systems this should already be the case.
When working with a self-signed certificate, this means installing the self-signed certificate into the system.
Install a Self-Signed Certificate on Debian
As an example of installing a self-signed certificate to the system, in
Debian/Ubuntu any certificate can be copied to the directory
/usr/local/share/ca-certificates/ and then the certificate store can be rebuilt.
$ sudo cp /etc/ssl/influxdb-selfsigned.crt /usr/local/share/ca-certificates/
$ sudo update-ca-certificates
Updating certificates in /etc/ssl/certs...
1 added, 0 removed; done.
Running hooks in /etc/ca-certificates/update.d...

Replacing debian:influxdb-selfsigned.pem
done.
done.
If a self-signed or other certificate has been added to the system the Chronograf service needs to be restarted to gather the new certificate information.
$ sudo systemctl restart chronograf.serviceAdding a Kapacitor Connection in Chronograf
The following instructions apply to the Chronograf UI. If Chronograf has been installed it can be found by default at port 8888 (e.g. http://localhost:8888).
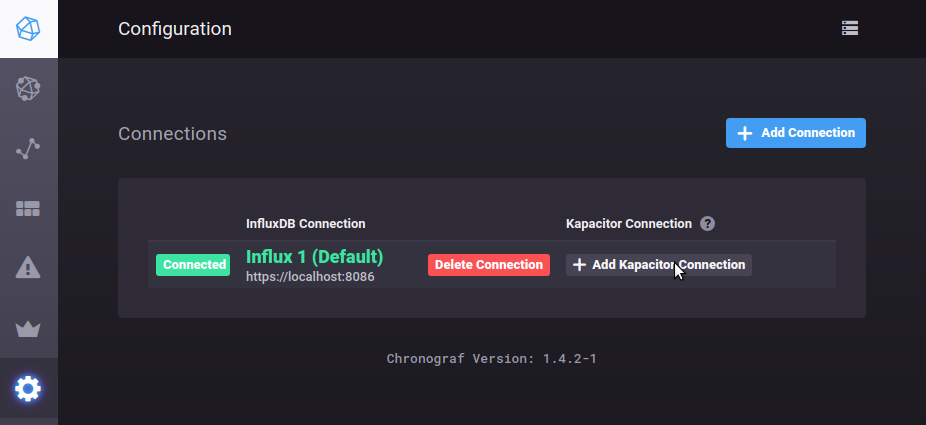
- In the left side navigation bar open the Configuration page. This will show all available InfluxDB connections. In the row containing the InfluxDB connection for which a Kapacitor connection is to be added, click the link Add Kapacitor Connection. This will load the Add a New Kapacitor Connection page.
Image 1 – Adding a Kapacitor Connection

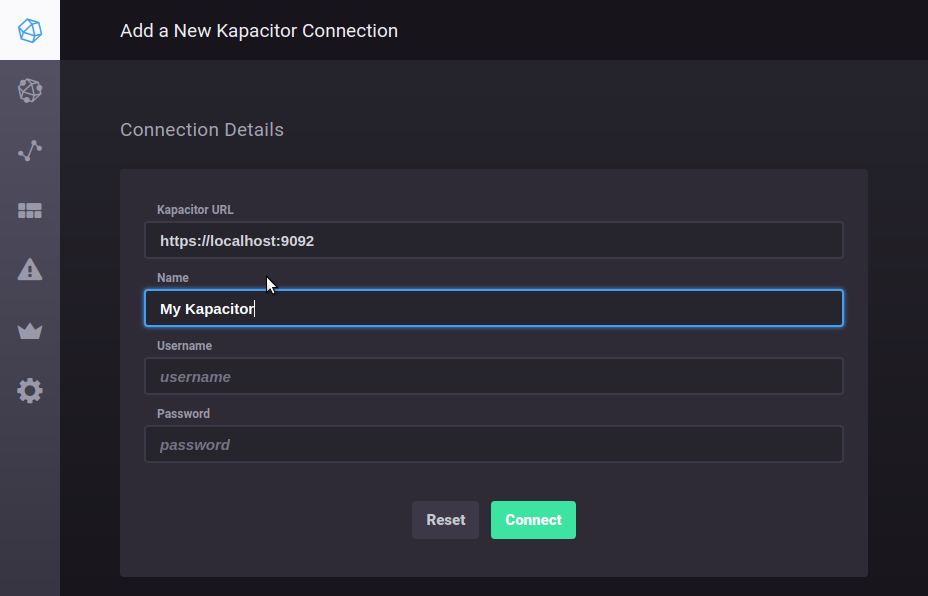
- In the Connection Details group fill in such details as a name for the connection and click the Connect button.
Image 2 – Kapacitor Connection Details

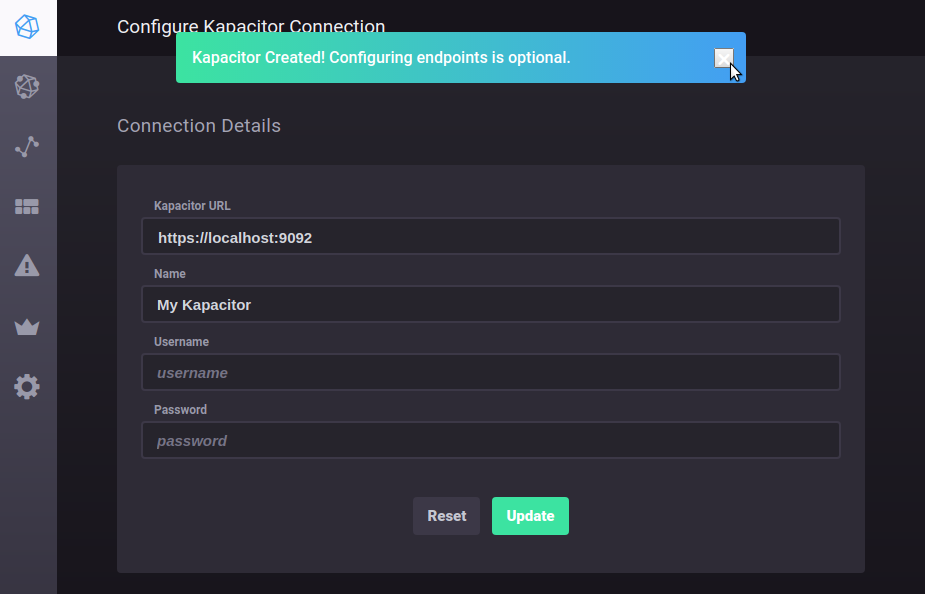
- If the certificate is installed on the system a success notification will appear.
Image 3 – Kapacitor Connection Success

If an error notification is returned check the Chronograf log for proxy errors. For example:
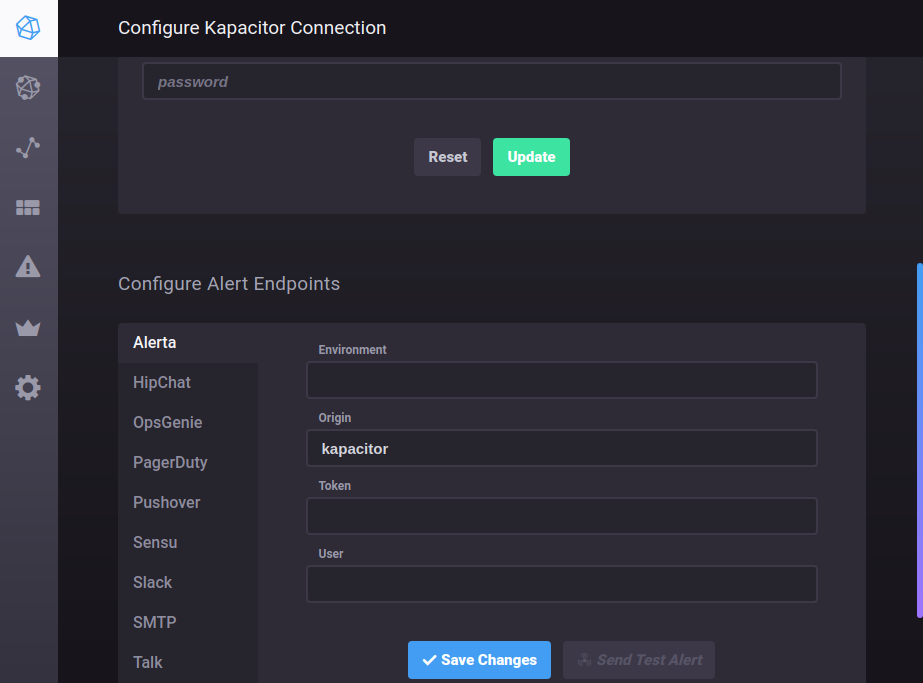
mar 06 13:53:07 lenovo-tp02 chronograf[12079]: 2018/03/06 13:53:07 http: proxy error: x509: certificate is valid for locahlost, not localhost- Also tabbed forms for editing and adding Kapacitor Handler Endpoints will appear. In wider screens they will be to the right of the Connection Details group. In narrower screens they will be below the Connection Details group.
Image 4 – Configure Kapacitor Handler Endpoints

At this point Kapacitor can be used to generate alerts and TICKscripts through Chronograf. These features are available through the Alerting item in the left navigation bar.
Was this page helpful?
Thank you for your feedback!
Support and feedback
Thank you for being part of our community! We welcome and encourage your feedback and bug reports for Kapacitor and this documentation. To find support, use the following resources:
