
Use the InfluxDB 3 MCP server
InfluxDB provides two Model Context Protocol (MCP) servers for integrating with AI assistants:
Manage your InfluxDB instance with the database MCP server
The InfluxDB database MCP server lets you interact with InfluxDB 3 Enterprise using natural language with large language model (LLM) agents. It enables database management, token handling, and SQL query generation in plain English—no coding required.
This section walks you through configuring your LLM agent to run and use the InfluxDB database MCP server to interact with your InfluxDB 3 Enterprise server
.
Prerequisites
- Node.js v18+ (if using
npxto run the MCP server) - Docker (if using Docker to run the MCP server)
- A running and reachable InfluxDB 3 Enterprise server
.
A valid InfluxDB 3 Enterprise admin or resource token with appropriate resource-specific permissions
(Optional) An LLM assistant like Claude Desktop, ChatGPT Desktop, etc.
Configure the database MCP server
Use environment variables to configure the InfluxDB 3 MCP server and connect it to your InfluxDB 3 Enterprise server
. Set the following environment variables when you start the MCP server:
Required InfluxDB connection variables
INFLUX_DB_PRODUCT_TYPE:
enterpriseINFLUX_DB_INSTANCE_URL: Your InfluxDB 3 Enterprise URL–for example:
http://localhost:8181If using Docker to run the InfluxDB MCP server and you want to manage an InfluxDB instance running on
localhost, use the internal Docker network to connect to your local InfluxDB 3 Enterprise server–for example:http://host.docker.internal:8181/INFLUX_DB_TOKEN: Your InfluxDB 3 Enterprise admin token or resource token.
If using a resource token, your LLM agent can only perform the operations allowed by the token permissions.
Configure your LLM agent to run the database MCP server
To run the MCP server, use either Node.js and npm or Docker.
Some LLM agents, like Claude Desktop, start, run,
and connect to the MCP server for you.
The following instructions show how to configure Claude Desktop to use the InfluxDB database MCP server.
Clone the influxdata/influxdb3_mcp_server repository from GitHub.
Navigate to the
influxdb3_mcp_serverproject directory:cd influxdb3_mcp_server/Install dependencies:
npm installBuild the MCP server:
npm run build
This builds the files necessary to run the MCP server and stores them in ./build.
The ./build/index.js file starts the MCP server.
Configure your LLM Agent to use the Node.js-based MCP server
In Claude Desktop, go to Settings > Developer and edit your configuration. Enter the following JSON configuration:
{
  "mcpServers": {
    "influxdb": {
      "command": "node",
      "args": ["/path/to/influxdb3_mcp_server/build/index.js"],
      "env": {
        "INFLUX_DB_PRODUCT_TYPE": "enterprise",
        "INFLUX_DB_INSTANCE_URL": "http://localhost:8181
",
        "INFLUX_DB_TOKEN": "AUTH_TOKEN"
      }
    }
  }
}
Replace the following:
path/to: The absolute path to yourinfluxdb3_mcp_serverproject directory.AUTH_TOKEN: Your InfluxDB 3 Enterprise token. The permissions granted by the token determine what operations your LLM agents can perform.
Configure your LLM Agent to use the Docker-based MCP server
In Claude Desktop, go to Settings > Developer and edit your configuration. Enter the following JSON configuration:
In the examples below, replace the following:
path/to: The absolute path to yourinfluxdb3_mcp_serverproject directory.AUTH_TOKEN: Your InfluxDB 3 Enterprise token. The permissions granted by the token determine what operations your LLM agents can perform.
Connect to a remote InfluxDB server
{
  "mcpServers": {
      "influxdb": {
      "command": "docker",
      "args": [
        "run",
        "--rm",
        "--interactive",
        "--env",
        "INFLUX_DB_PRODUCT_TYPE",
        "--env",
        "INFLUX_DB_INSTANCE_URL",
        "--env",
        "INFLUX_DB_TOKEN",
        "influxdata/influxdb3-mcp-server"
      ],
      "env": {
        "INFLUX_DB_PRODUCT_TYPE": "enterprise",
        "INFLUX_DB_INSTANCE_URL": "http://localhost:8181
",
        "INFLUX_DB_TOKEN": "AUTH_TOKEN"
      }
    }
  }
}
Connect to a local InfluxDB server
{
  "mcpServers": {
      "influxdb": {
      "command": "docker",
      "args": [
        "run",
        "--rm",
        "--interactive",
        "--add-host=host.docker.internal:host-gateway",
        "--env",
        "INFLUX_DB_PRODUCT_TYPE",
        "--env",
        "INFLUX_DB_INSTANCE_URL",
        "--env",
        "INFLUX_DB_TOKEN",
        "influxdata/influxdb3-mcp-server"
      ],
      "env": {
        "INFLUX_DB_PRODUCT_TYPE": "enterprise",
        "INFLUX_DB_INSTANCE_URL": "http://host.docker.internal:8181",
        "INFLUX_DB_TOKEN": "AUTH_TOKEN"
      }
    }
  }
}
Supported features
Once connected, you can use your LLM agent to perform tasks on your InfluxDB 3 Enterprise server
, including:
- Create, update, and delete databases
- List tables and inspect schemas
- Create and manage tokens
- Query data without writing SQL or InfluxQL
- Check server health and connection status
Examples of supported prompts
“List all tables in the
productiondatabase.”“Create a read-only token for the
metricsdatabase.”“Analyze last week’s sensor data for anomalies.”
“Create a new database called
iot_sensorswith a 30-day retention policy.”“Show me the schema for the
sensor_datatable.”
Query documentation from your IDE
The InfluxDB documentation MCP server lets AI tools and agents search InfluxDB InfluxDB 3 Enterprise documentation directly from your development environment. Use it to find answers, code examples, and configuration details without leaving your IDE.
Why use the documentation MCP server?
When you connect the documentation MCP server to your AI coding assistant, the assistant can search InfluxDB and related tool documentation to answer your questions with accurate, up-to-date information. Instead of switching to a browser or guessing at syntax, you can ask questions in your IDE and get responses grounded in official documentation.
Common use cases:
- Get help writing queries, client library code, or CLI commands
- Look up configuration options and environment variables
- Find code examples for specific tasks
- Troubleshoot errors with documentation-backed answers
Install the documentation MCP server
The documentation MCP server is a hosted service—you don’t need to install or run anything locally. Add the server URL to your AI assistant’s MCP configuration.
On first use, you’ll be prompted to sign in with a Google or GitHub account. This authentication is used only for rate limiting—no personal data is collected.
MCP server URL:
https://influxdb-docs.mcp.kapa.aiThe server uses SSE (Server-Sent Events) transport.
Configure your AI assistant to use the documentation MCP server
The following instructions show how to configure popular AI assistants to use the InfluxDB documentation MCP server.
In Claude Desktop, go to Settings > Developer and edit your configuration. Add the following JSON configuration:
{
  "mcpServers": {
    "influxdb-docs": {
      "url": "https://influxdb-docs.mcp.kapa.ai"
    }
  }
}
Save the file and restart Claude Desktop for the changes to take effect.
In ChatGPT Desktop, go to Settings > Integrations > Enable MCP and add a new server. Add the following JSON configuration:
{
  "mcpServers": {
    "influxdb-docs": {
      "url": "https://influxdb-docs.mcp.kapa.ai",
      "transport": "sse"
    }
  }
}
Save the configuration and restart ChatGPT Desktop.
In VS Code, configure GitHub Copilot to use the MCP server:
- Create or edit
.vscode/mcp.jsonin your workspace or project directory - Add the following configuration:
{
  "servers": {
    "influxdb-docs": {
      "type": "http",
      "url": "https://influxdb-docs.mcp.kapa.ai"
    }
  }
}- Restart or reload VS Code
- Open the Command Palette (
Ctrl+Shift+PorCmd+Shift+P) - Run MCP: List Servers to verify the server is registered
The InfluxDB documentation MCP server will now be available through GitHub Copilot Chat.
In Cursor, add the MCP server configuration to your MCP settings file.
- Open Settings and navigate to MCP Servers
- Click Add MCP Server or edit the configuration file directly
- Add the following configuration to
.cursor/mcp.json(project-level) or~/.cursor/mcp.json(global):
{
  "mcpServers": {
    "influxdb-docs": {
      "url": "https://influxdb-docs.mcp.kapa.ai",
      "transport": "streamableHttp"
    }
  }
}
Save the file and restart Cursor.
In OpenCode, configure the MCP server in your configuration file:
- Create or edit
opencode.json(oropencode.jsonc) in your workspace - Add the following configuration:
{
  "$schema": "https://opencode.ai/config.json",
  "mcp": {
    "influxdb-docs": {
      "type": "remote",
      "url": "https://influxdb-docs.mcp.kapa.ai",
      "enabled": true
    }
  }
}- Start OpenCode and use the
/initcommand to verify the MCP server is accessible
The InfluxDB documentation search tools will be available in your OpenCode sessions.
Authentication and rate limits
When you connect to the documentation MCP server for the first time, a sign-in window opens where you can choose to authenticate with a Google or GitHub account.
The hosted MCP server uses your account only to generate a stable, opaque user ID for rate limiting—no personal data is collected:
- Google: Requests only the
openidscope. Does not requestemailorprofilescopes—your name, email address, and other personal data are not collected. - GitHub: Requests no OAuth scopes. With no scopes requested, GitHub grants read-only access to public profile information only. The server does not access repositories, organizations, email addresses, or other GitHub data.
The anonymous user ID enforces per-user rate limits to prevent abuse:
- 40 requests per user per hour
- 200 requests per user per day
If you sign in with Google, the consent screen may display
“Associate you with your personal info on Google.”
This is Google’s generic wording for the openid scope—it means the app can recognize
that the same Google account is signing in again.
It does not grant access to your email, name, contacts, or other data.
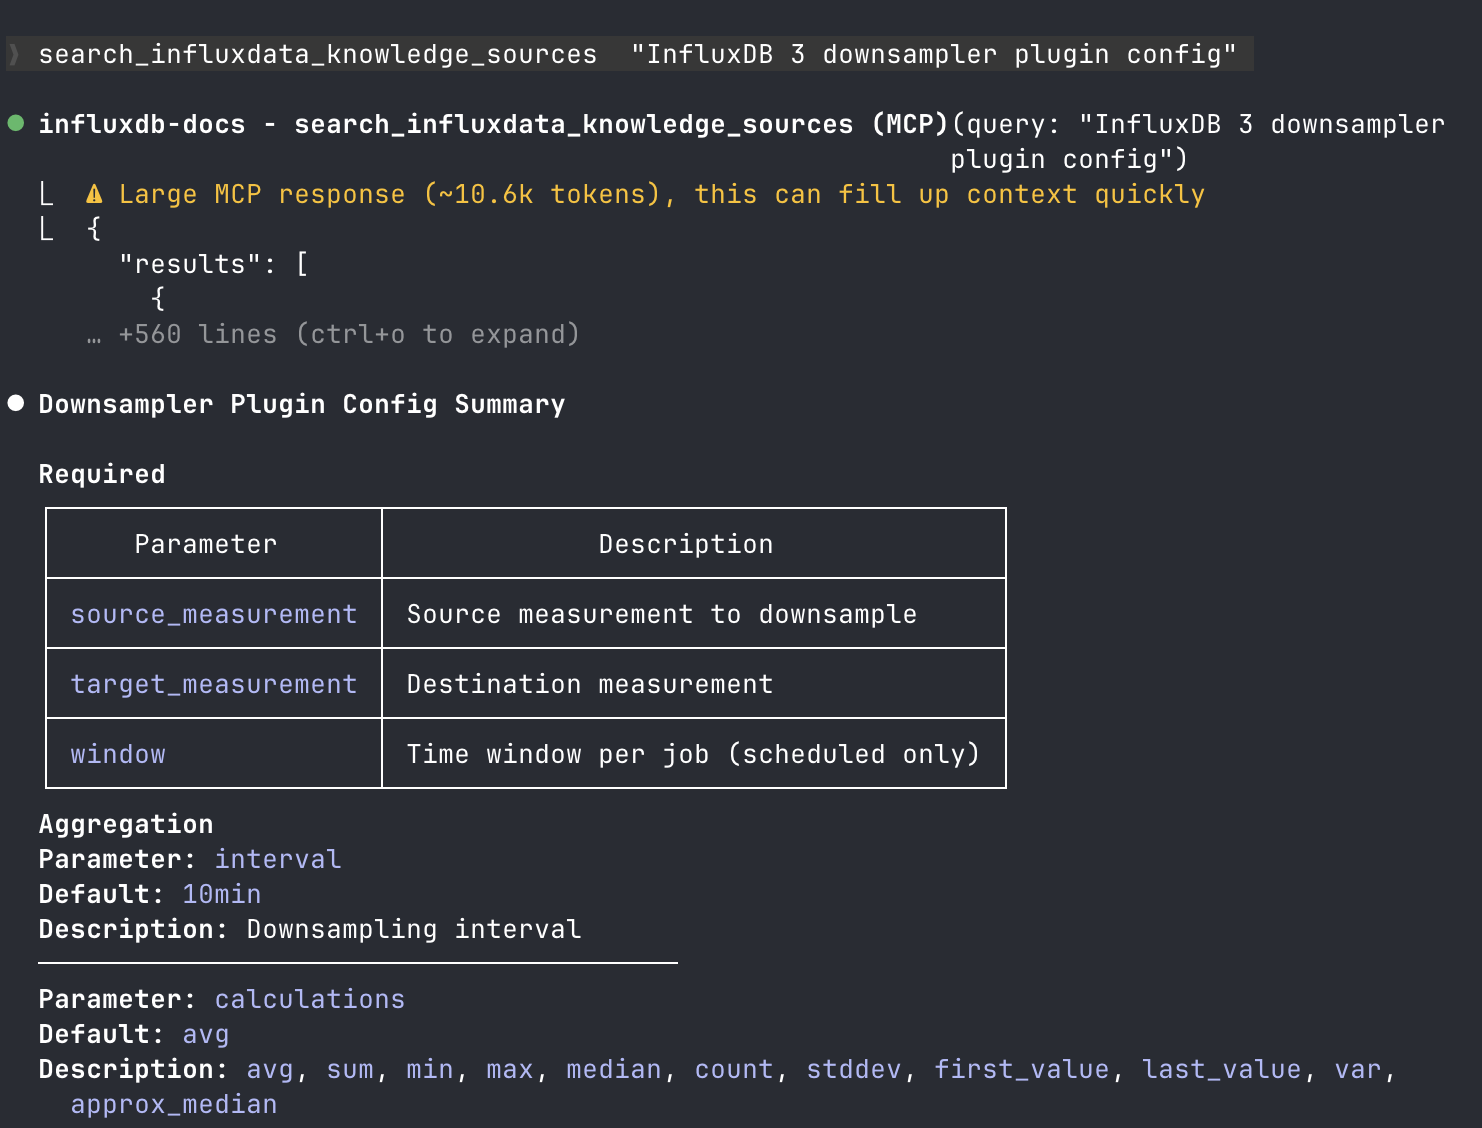
Search documentation with the MCP tool
The documentation MCP server exposes a semantic search tool:
search_influxdb_knowledge_sourcesThis tool lets AI agents perform semantic retrieval over InfluxDB documentation and related knowledge sources.
What the tool does:
- Searches all InfluxDB documentation for a given query
- Returns the most relevant chunks in descending order of relevance
- Each chunk is a self-contained snippet from a single documentation page
Response format:
Each result includes:
source_url: URL of the original documentation pagecontent: The chunk content in Markdown
Use the documentation MCP server
After you install the documentation MCP server, your AI assistant can search InfluxDB documentation to help you with tasks. Ask questions naturally—the assistant uses the MCP server to find relevant documentation and provide accurate answers.
Example prompts
“How do I write data to InfluxDB using Python?”
“What’s the syntax for a SQL query with a WHERE clause in InfluxDB?”
“Show me how to configure Telegraf to collect CPU metrics.”
“What environment variables does the InfluxDB CLI use?”
“How do I create a database token with read-only permissions?”
Was this page helpful?
Thank you for your feedback!
Support and feedback
Thank you for being part of our community! We welcome and encourage your feedback and bug reports for InfluxDB 3 Enterprise and this documentation. To find support, use the following resources:
Customers with an annual or support contract can contact InfluxData Support. Customers using a trial license can email trial@influxdata.com for assistance.