
Create a table
Use the Admin UI or the influxctl table create command
to create a table in a specified database in your
InfluxDB Cloud Dedicated cluster.
With InfluxDB Cloud Dedicated, tables and measurements are synonymous. Typically, tables are created automatically on write using the measurement name specified in line protocol written to InfluxDB. However, to apply a custom partition template to a table, you must manually create the table with custom partitioning before you write any data to it.
Partitioning defaults to %Y-%m-%d (daily).
When a partition template is applied to a database, it becomes the default template
for all tables in that database, but can be overridden when creating a
table.
Create a table
The InfluxDB Cloud Dedicated administrative UI includes a portal for creating and managing tables.
To access the InfluxDB Cloud Dedicated Admin UI, visit the following URL in your browser:
https://console.influxdata.com
Use the credentials provided by InfluxData to log into the Admin UI. If you don’t have login credentials, contact InfluxData support.
In the cluster list, find and click the cluster you want to create a database in. You can sort on column headers or use the Search field to find a specific cluster.
In the database list, find and click the database you want to create a table in. You can sort on column headers or use the Search field to find a specific database.
Click the New Table button above the table list. The Create table dialog displays.
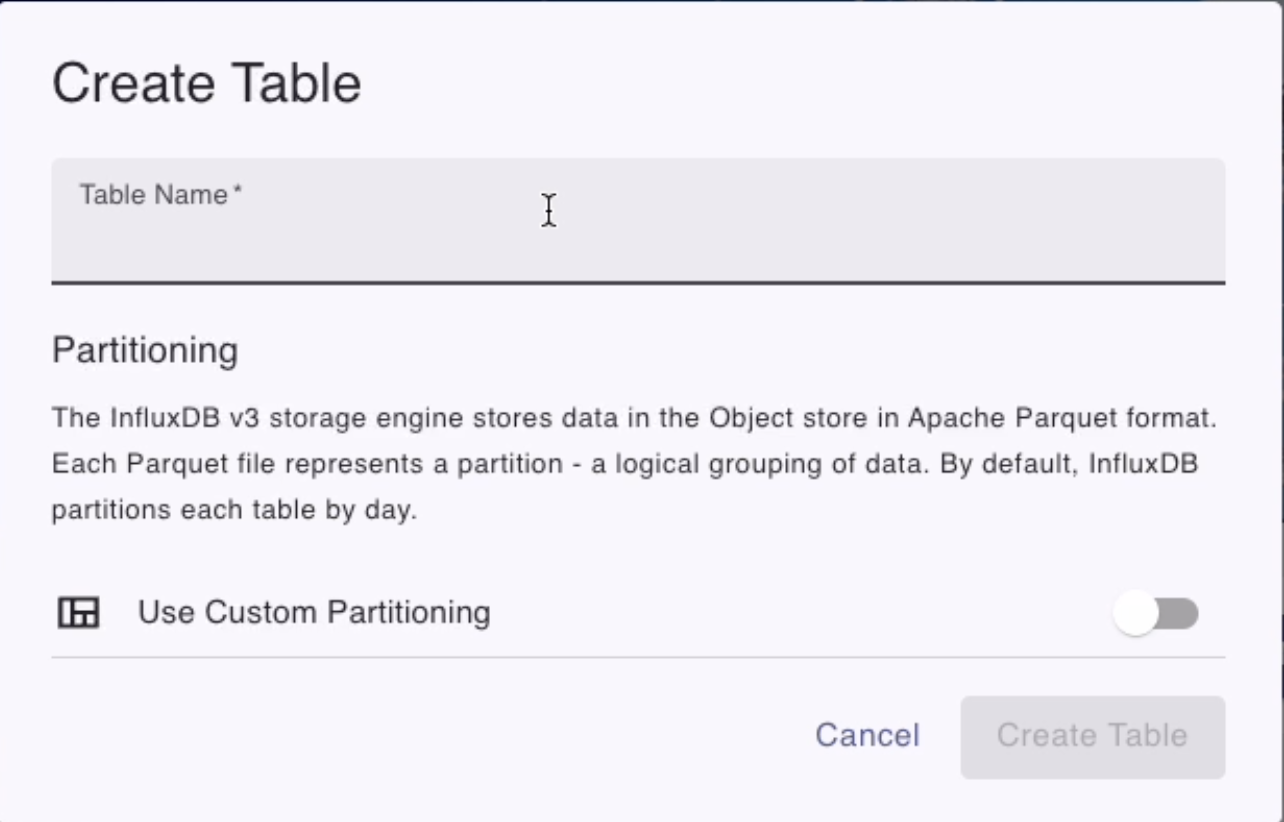
In the Create table dialog, provide a Table name. For naming restrictions, see Naming restrictions and conventions.
Leave Use custom partitioning set to Off. By default, the table inherits the database’s partition template. If no custom partition template is applied to the database, the table inherits the default partitioning of
%Y-%m-%d(daily).Click the Create Table button.
- If you haven’t already, download and install the
influxctlCLI. - Run the
influxctl table createcommand:
# Create a table with the same partitioning as the database
influxctl table create \
  DATABASE_NAME \
  TABLE_NAME
Replace:
DATABASE_NAME: the database to create the table inTABLE_NAME: the name for your new table
This example uses cURL to send a Management HTTP API request, but you can use any HTTP client.
- If you haven’t already, follow the instructions to install cURL for your system.
- In your terminal, use cURL to send a request to the following InfluxDB Cloud Dedicated endpoint:
POST https://console.influxdata.com/api/v0/accounts/ACCOUNT_ID/clusters/CLUSTER_ID/databases/DATABASE_NAME/tables
# Create a table with the same partitioning as the database
curl \
  --location "https://console.influxdata.com/api/v0/accounts/ACCOUNT_ID/clusters/CLUSTER_ID/databases/DATABASE_NAME/tables" \
  --request POST \
  --header "Authorization: Bearer MANAGEMENT_TOKEN" \
  --json '{
    "name": "TABLE_NAME"
  }'
Replace the following:
ACCOUNT_ID: the account ID for the cluster (list details via the Admin UI or CLI)CLUSTER_ID: the cluster ID (list details via the Admin UI or CLI).MANAGEMENT_TOKEN: a valid management token for your InfluxDB Cloud Dedicated clusterDATABASE_NAME: the name of the database to create the table inTABLE_NAME: the name for your new table
Create a table with custom partitioning
InfluxDB Cloud Dedicated lets you define a custom partitioning strategy for each database and table. A partition is a logical grouping of data stored in Apache Parquet By default, data is partitioned by day, but, depending on your schema and workload, customizing the partitioning strategy can improve query performance.
To use custom partitioning, you define a partition template. If a table doesn’t have a custom partition template, it inherits the database’s template.
To access the InfluxDB Cloud Dedicated Admin UI, visit the following URL in your browser:
https://console.influxdata.com
Use the credentials provided by InfluxData to log into the Admin UI. If you don’t have login credentials, contact InfluxData support.
In the cluster list, find and click the cluster you want to create a database in. You can sort on column headers or use the Search field to find a specific cluster.
In the database list, find and click the database you want to create a table in. You can sort on column headers or use the Search field to find a specific database.
Click the New Table button above the table list. The Create table dialog displays.
In the Create table dialog, provide a Table name. For naming restrictions, see Naming restrictions and conventions.
Toggle Use custom partitioning to On. The Custom partition template section displays.
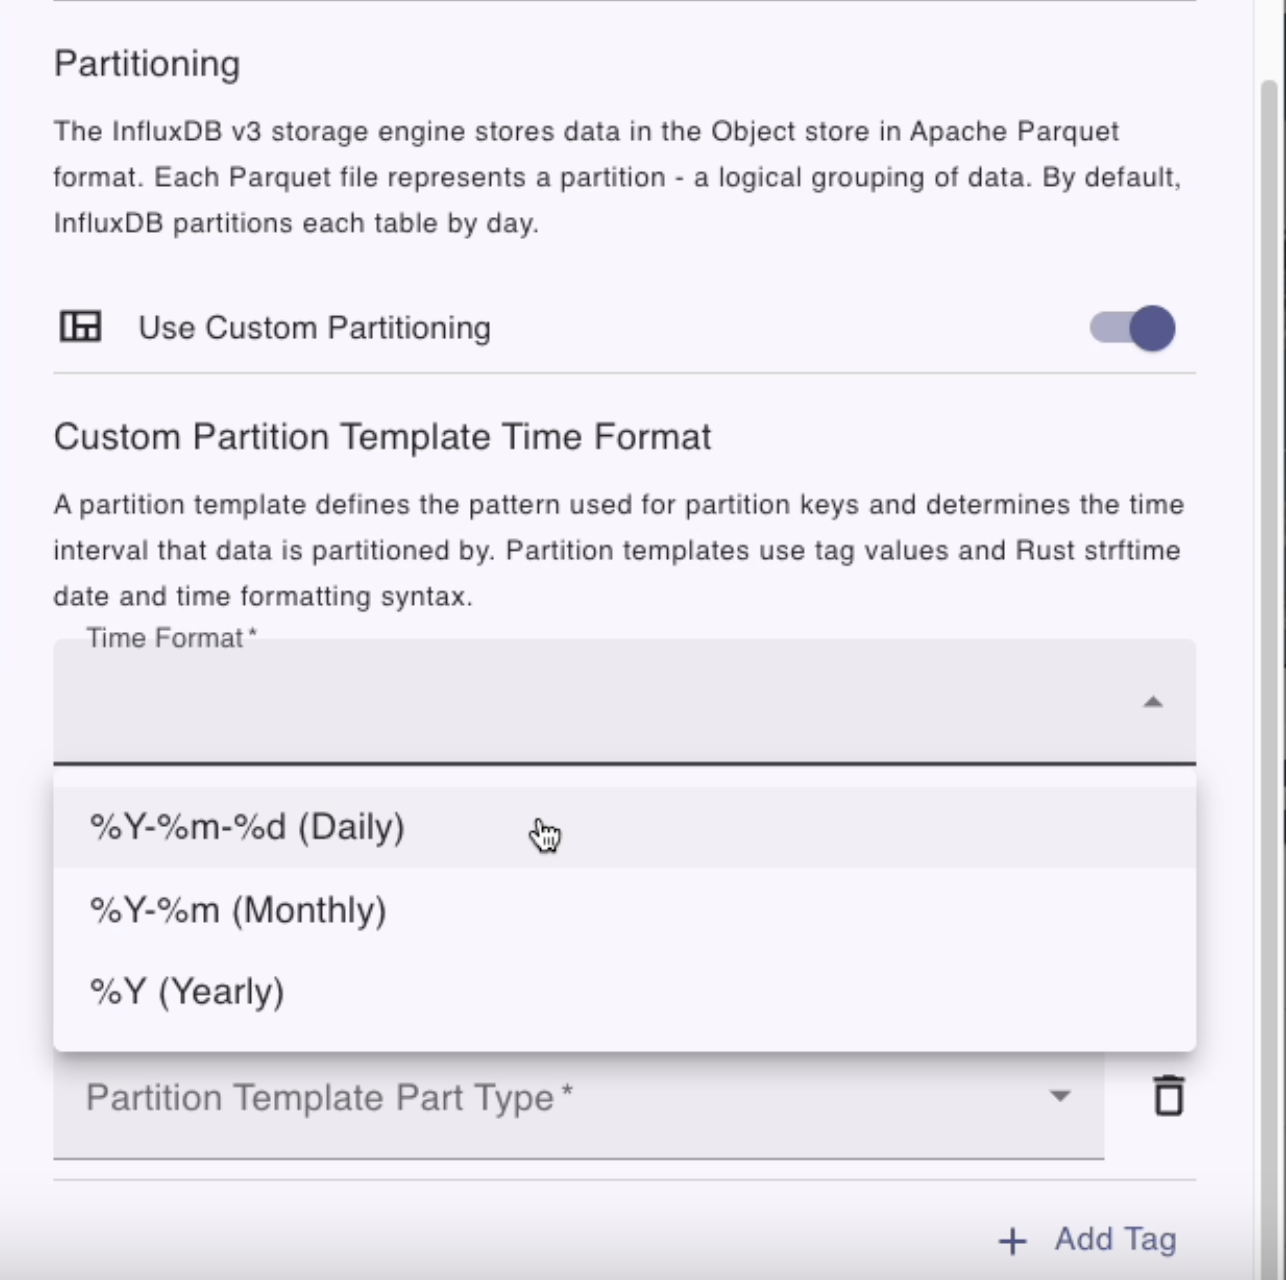
Provide the following:
- Custom partition template time format: The time part for partitioning data (yearly, monthly, or daily).
- Optional: Custom partition template tag parts: The tag parts for partitioning data.
- Optional: Custom partition template tag bucket parts: The tag bucket parts for partitioning data.
Optional: To add more parts to the partition template, click the Add Tag button. For more information, see Partition template requirements and guidelines.
Click the Create Table button to create the table. The new table displays in the list of tables for the cluster.
If you haven’t already, download and install the
influxctlCLI.Use the following
influxctl table createcommand flags to specify the partition template parts:--template-timeformat: A Rust strftime date and time string that specifies the time part in the partition template and determines the time interval to partition by. Use one of the following:%Y-%m-%d(daily)%Y-%m(monthly)%Y(annually)
--template-tag: An [InfluxDB tag] to use in the partition template.--template-tag-bucket: An InfluxDB tag and number of “buckets” to group tag values into. Provide the tag key and the number of buckets to bucket tag values into separated by a comma:tagKey,N.
# Create a table with custom partitioning
influxctl table create \
  --template-tag tag1 \
  --template-tag tag2 \
  --template-tag-bucket tag3,100 \
  --template-tag-bucket tag4,300 \
  --template-timeformat '%Y-%m-%d' \
  DATABASE_NAME \
  TABLE_NAME
Replace the following:
TAG_KEY_1,TAG_KEY_2: tag keys to partition byTAG_KEY_3,TAG_KEY_4: tag keys for bucketed partitioning100,300: number of buckets to group tag values into’%Y-%m-%d’: Rust strftime date and time string that specifies the time part in the partition templateDATABASE_NAME: the name of the database to create the table inTABLE_NAME: the name you want for the new table
This example uses cURL to send a Management HTTP API request, but you can use any HTTP client.
- If you haven’t already, follow the instructions to install cURL for your system.
- In your terminal, use cURL to send a request to the following InfluxDB Cloud Dedicated endpoint:
POST https://console.influxdata.com/api/v0/accounts/ACCOUNT_ID/clusters/CLUSTER_ID/databases/DATABASE_NAME/tables
In the request body, include the partitionTemplate property and specify the partition template parts as an array of objects–for example:
# Create a table with custom partitioning
curl \
  --location "https://console.influxdata.com/api/v0/accounts/ACCOUNT_ID/clusters/CLUSTER_ID/databases/DATABASE_NAME/tables" \
  --request POST \
  --header "Authorization: Bearer MANAGEMENT_TOKEN" \
  --json '{
    "name": "TABLE_NAME",
    "partitionTemplate": [
      { "type": "tag", "value": "TAG_KEY_1" },
      { "type": "tag", "value": "TAG_KEY_2" },
      { "type": "bucket", "value": { "tagName": "TAG_KEY_3", "numberOfBuckets": 100 } },
      { "type": "bucket", "value": { "tagName": "TAG_KEY_4", "numberOfBuckets": 300 } },
      { "type": "time", "value": "%Y-%m-%d" }
    ]
  }'
Replace the following:
ACCOUNT_ID: the account ID for the cluster (list details via the Admin UI or CLI)CLUSTER_ID: the cluster ID (list details via the Admin UI or CLI).MANAGEMENT_TOKEN: a valid management token for your InfluxDB Cloud Dedicated clusterDATABASE_NAME: the name of the database to create the table inTABLE_NAME: the name you want for the new tableTAG_KEY_1,TAG_KEY_2: tag keys to partition byTAG_KEY_3,TAG_KEY_4: tag keys for bucketed partitioning100,300: number of buckets to group tag values into’%Y-%m-%d’: Rust strftime date and time string that specifies the time part in the partition template
Partition template requirements and guidelines
Always specify 1 time part in your template. A template has a maximum of 8 parts: 1 time part and up to 7 total tag and tag bucket parts.
For more information about partition template requirements and restrictions, see Partition templates.
Partition templates can only be applied on create
You can only apply a partition template when creating a table. You can’t update a partition template on an existing table.
Was this page helpful?
Thank you for your feedback!
Support and feedback
Thank you for being part of our community! We welcome and encourage your feedback and bug reports for InfluxDB Cloud Dedicated and this documentation. To find support, use the following resources:
Customers with an annual or support contract can contact InfluxData Support.